
The problem
As a biologist and instructor working in computational genomics I frequently teach workshops and classes aimed at introducing new computational methods that draw on a variety of computer languages and software. And, as anyone who teaches computational methods knows well, the most difficult part of running a workshop is troubleshooting installation problems on the varied computers of participants (that one person with a chromebook, or Windows 95); a task that feels particularly thankless when only teaching a one-time workshop. An alternative strategy that would allow participants to jump straight into learning code on a system with all requirements pre-installed can save a ton of time.
A convenient solution
I love teaching with jupyter notebooks and so I will focus on setting up an environment that easily allows users to connect to pre-loaded tutorial notebooks, and to modify their environment (e.g., install more software) if needed. After trying many different solutions (HPC accounts, collaboratory, binder), I’ve settled on hosting a jupyterhub from my lab workstation as my favorite option. This post describes how I set this up and why I think it’s great. I provide instructions so others can replicate or improve this setup, and to document the steps involved (so I can remember them!).
Jupyterhub
My jupyterhub server is accessible from my lab website (https://eaton-lab.org) on a subdomain (https://jhub.eaton-lab.org). The site itself is a simple static site hosted on github, which anyone can set up for free, and the domain name costs $12/year. No matter what computer you are using (even a phone) you can connect and login to this URL and connect directly to a jupyter notebook. The GIF below demonstrates the general idea:
The key steps involved are (1) deciding how to authenticate users (e.g., passwords versus external authenticators like Google or GitHub); (2) setting up SSL so that authentication data is encrypted; and (3) setting up user accounts. The latter task can be done in a number of ways: for example, you can make separate accounts for each user on the workstation/computer running the server, or, you can sandbox users inside docker containers (or kubernetes, or similar alternatives).
I set up Docker containers as I found it was the easiest solution to allow both long-term users (e.g., lab members) and temporary users (e.g., workshop participants) to both use the system safely. Docker also allows me to provide pre-installed software, while also allowing users to install additional software into their own isolated and persistent containers. Finally, for temporary users, I can easily clean up and remove their containers when the workshop or class is finished.
jupyterhub requirements
My setup is based on the zero to jupyterhub tutorial, but I deviated from these instructions a bit as well. For me, it was important to set up the software environment how I wanted it, and to host the server locally, not on a paid amazon server or the like. I’ve tried to distil the instructions from there to further explain the sections that I found most confusing given my limited experience with networking. Here is what we will need to get started:
- A linux/unix system -- (in my case Ubuntu.)
- Python 3.4 or greater -- (we'll install a Py37 conda env.)
- A static IP address -- (easy to get.)
- TLS certificate and key (easy to get.)
- Domain name (purchase, get from your institution, or use free options.)
Step 1. Get a static IP address for your server
If you are at a University you can ask your IT department to set up a static IP address for you. They will send it to you in an email. Otherwise google “how to get a static IP”. It is the IP address you will run your server from.
Step 2. Register a domain and subdomain
My lab website is hosted by GitHub using their free service for hosting static
sites. These are easy to set up by placing a bit of code into a GitHub
repository. In order to link this site (eaton-lab.github.io) to
a jupythub server, however, I needed a domain name that I could control.
So I purchased the domain eaton-lab.org from google domains ($12/year),
and set it up to forward my GitHub site to the new domain. I explain below
how to do this. If you’re on a tight budget there are free services for
getting a domain (https://www.noip.com/),
which worked for me just fine when I was first testing this out.
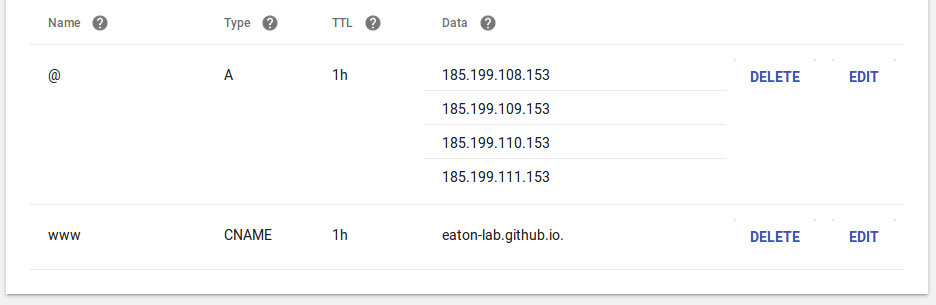
To set up domain forwarding for a GitHub site go to settings in the GitHub repository for your site and set the “custom domain” to your new domain name. Then go to the DNS settings on domains.google.com, or where ever your domain is hosted, and enter the GitHub IP address as the A record like below (just enter the same values I did below), and then enter the GitHub domain address as the CNAME record.
Your GitHub site will now be served on the domain name that your purchased
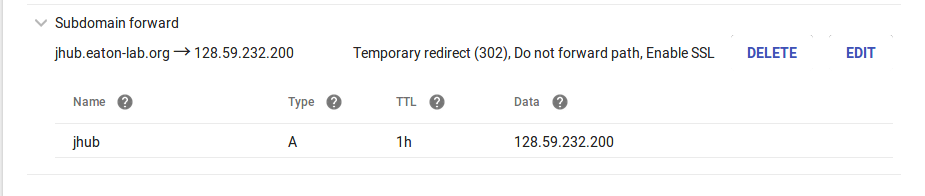
(it takes a few minutes to sync). I then set up my jupyterhub server to be
accessible from this site on a subdomain (jhub.eaton-lab.org) by
registering a subdomain like below.
This is where you need to enter the static IP address. When we start
the server we will tell it to serve at that IP address.
Step 3. Install miniconda3 in /opt/
The easiest way to get all required software is to use conda. We will need
to be able to run jupyterhub using sudo, and in a place that is accessible to all users (e.g., not from your user home directory), and so it’s easiest to install a separate and dedicated conda dir just for running your jupyterhub.
A common place for this is in /opt/. The commands below will install a fresh
miniconda installation into /opt.
## download a new miniconda3 installer (if on Mac use the Mac version!)
curl -O https://repo.continuum.io/miniconda/Miniconda3-latest-Linux-x86_64.sh

## install miniconda dir into /opt/miniconda
## -b agrees to the license terms
## -p sets the install prefix path
sudo bash Miniconda3-latest-Linux-x86_64.sh -b -p /opt/miniconda
Step 4. Install jupyterhub in /opt/miniconda/bin/
Now install jupyterhub and a few additional dependencies. Again, we’ll use sudo when installing the software, and because the user environment is hidden when using sudo, you need to write out the full path to the conda or pip binary.
## write the full path to the opt/ conda binary
sudo /opt/miniconda/bin/conda install -c conda-forge jupyterhub notebook ipykernel
And then install a few extra tools with pip, which we’ll be using to set up a user authenticator, and to run docker.
## write the full path to the opt/ pip binary
sudo /opt/miniconda/bin/pip install oauthenticator dockerspawner netifaces
Step 5. Create jupyterhub directory in /srv/
Servers facing out to the world should be run from the /srv/ directory,
which also requires sudo permissions to modify, so let’s start by
creating a directory for our config files there. This directory will
contain some sensitive information, so for some types of setups
you may want to modify the steps here to ensure users cannot
see the information which could provide them access to your system.
If you are following the same setup as me then connected users will end up
in isolated Docker containers when they login, and so they’ll never have
access to this location and security is not an issue.
## create a new server directory and cd into it
sudo mkdir -p /srv/jupyterhub
## set permissions so users can rwx here
sudo chmod ugo+rw /srv/jupyterhub
Step 6. Generate SSL certificates for your domain
We need to generate the SSL certificate that will allow users to “trust” our
site when they connect to it. Since we have a domain name registered, we can
generate a cert and key file using the free tool certbot. You can get
instructions for installing certbot on your system at
https://certbot.eff.org. I copied the Ubuntu
instructions below.
## install certbot on an Ubuntu system
sudo apt-get update
sudo apt-get install software-properties-common
sudo add-apt-repository universe
sudo add-apt-repository ppa:certbot/certbot
sudo apt-get update
sudo apt-get install certbot
To generate the certificates call the certbot program and provide it your
domain name. This will generate a 90 day certificate and a job to renew the
certificate every 30 days. The files will be written to
/etc/letsencrypt/live/[domain name], which you will need to use sudo to
look at.
# generate certificate
sudo certbot certonly --standalone -d jhub.eaton-lab.org

# test out the renewal process
sudo certbot -renew --dry-run
...
IMPORTANT NOTES:
 - Congratulations! Your certificate and chain have been saved at:
   /etc/letsencrypt/live/jhub.eaton-lab.org/fullchain.pem
   Your key file has been saved at:
   /etc/letsencrypt/live/jhub.eaton-lab.org/privkey.pem
   ...
Step 7. Start to configure Jupyterhub
The jupyterhub config file can be intimidating when you first look at it because there so many lines of options. But most of those lines are commented out by default, meaning that they have not effect – the file doesn’t actually do anything until you edit it. Generate the config file like below. Then we will edit it by adding the basic information required to securely connect to the jupyterhub.
## cd into jupyterhub dir
cd /srv/jupyterhub

## generate config file
/opt/miniconda/bin/jupyterhub --generate-config
## generate a random cookie secret and store it in /srv/jupyterhub
openssl rand -hex 32 > /srv/jupyterhub/jupyterhub_cookie_secret
%% editing /srv/jupyterhub/jupyter_config.py

## Configuration object for jupyterhub
c = get_config()

## SSL connection
c.Jupyterhub.jupyterhub_cookie_secret = "./jupyterhub_cookie_secret"
c.JupyterHub.ssl_key = "/etc/letsencrypt/live/jhub.eaton-lab.org/privkey.pem"
c.JupyterHub.ssl_cert = "/etc/letsencrypt/live/jhub.eaton-lab.org/fullchain.pem"
c.JupyterHub.port = 443             # standard port for SSL connections
c.JupyterHub.ip = '128.59.232.200'  # enter your static IP here
Step 8. Configure an Authenticator
We now want to add a method for authenticating usernames and passwords
so that users can log into our system and trust that we are not stealing
their information. One easy way to do this is to use external authenticators
serviced by GitHub or Google. I use GitHub. To do this we need to first
create an OAuthenticator app on GitHub. Login to your GitHub account and go
to Settings by clicking on your icon in the upper right corner, and then you
should see a list of tabs on the left side of the next screen. Choose
Developer settings, and then click on a button that says New OAuth App.
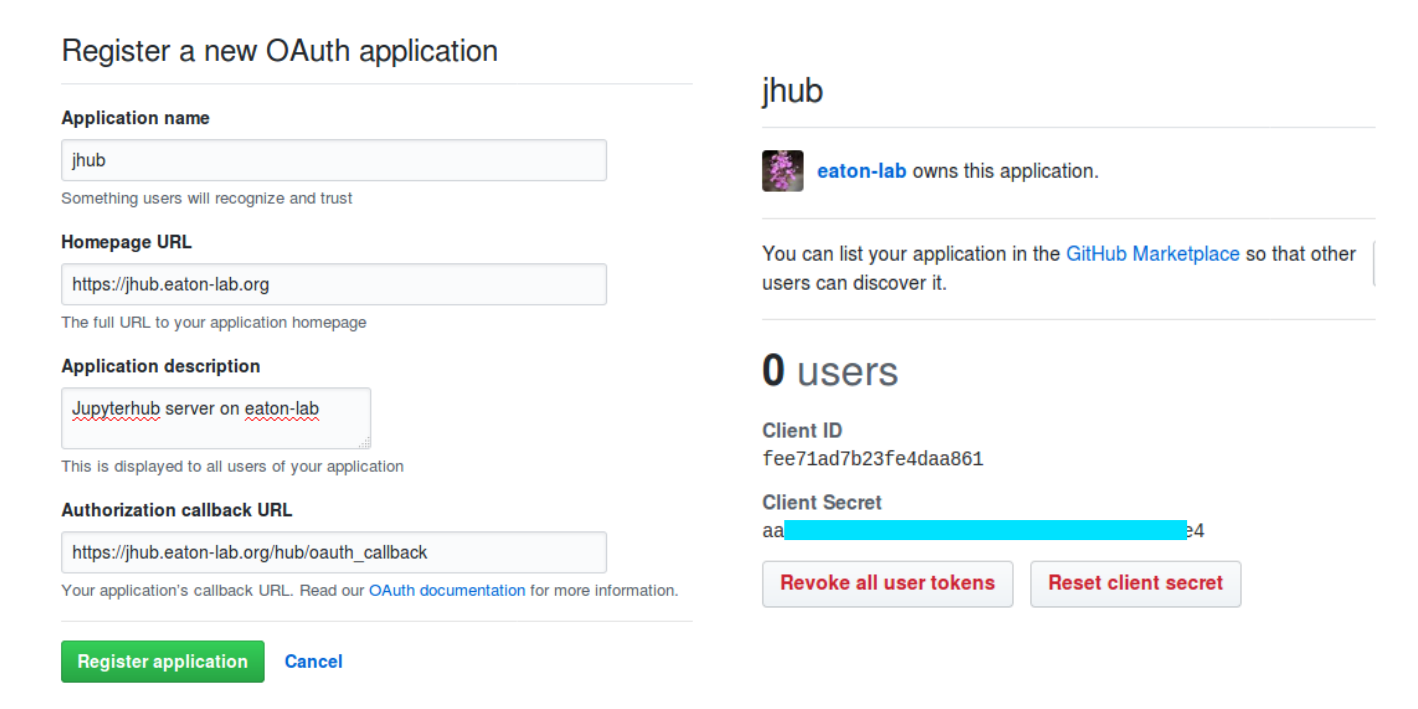
Register your app by giving it a name, we then need to save the callback URL.
This will generate a Client ID and Client Secret. We will need those keys.
Let’s then store these values in the jupyterhub config file after telling it
that we are using the GitHubOAuthenticator object as our authenticator.
The oauth callback url, client_id, and client_secret can be found on your
GitHub app (see above). Note: do not share your client_secret.
%% editing /srv/jupyterhub/jupyter_config.py

## Add authentication through github
c.JupyterHub.authenticator_class = "oauthenticator.GitHubOAuthenticator"
c.GitHubOAuthenticator.oauth_callback_url = 'https://jhub.eaton-lab.org/hub/oauth_callback'
c.GitHubOAuthenticator.client_id = 'fee71ad7b23fe4daa861'
c.GitHubOAuthenticator.client_secret = {hidden}  ## you would copy the real secret here
Now we need to tell jupyterhub which GitHub usernames are approved to login to our server (when running a workshop or class you can also add these on the fly later). I add my own username as an administrator, and optionally you can add a usermap dictionary that will translate GitHub login names to the user names on the workstation if they are different.
%% editing /srv/jupyterhub/jupyter_config.py

## Who is allowed access the server
c.Authenticator.admin_users = {"eaton-lab"}
c.Authenticator.whitelist = {
    "eaton-lab",
    "isaacovercast",
    "pmckenz1",
    "camayal",
}
c.Authenticator.username_map = {
    "eaton-lab": "deren",
    "pmckenz1": "patrick",
    "isaacovercast": "isaac",
    "camayal": "carlos",
}
Step 8. Configure a Spawner
Here I diverge from a simpler setup in order to provide two different spawning options, one for lab users that have a user account on the workstation, and another for temporary users that do not have permanent accounts. This is possible using the WrapSpawner, one of several available spawners from jupyterhub (e.g., we already installed DockerSpawner earlier). It can be installed with pip:
pip install git+https://github.com/jupyterhub/wrapspawner
In your config file you can then create multiple spawn profiles, each linked
to a different spawner setup. Here our different spawner setups include different docker images or volumes. In my setup Eaton-lab members use the dockerspawner.SystemUserSpawner which puts them in the jhub-lab3 docker image
but with access to their home directory on the system. Other temporary users
are spawned with dockerspawner.DockerSpawner as anonymous users (jovyan in
docker parlance). They will have a work directory that can persist over multiple
sessions until I eventually remove it.
%% editing /srv/jupyterhub/jupyter_config.py
c.JupyterHub.spawner_class = 'wrapspawner.ProfilesSpawner'
c.Spawner.http_timeout = 120
c.ProfilesSpawner.profiles = [

    # container image=labhub, volume=/home/<username>
    ('Eaton Lab (sacra system users)',
         'Eaton lab members',
         'dockerspawner.SystemUserSpawner',
         dict(
             image="dereneaton/jhub-lab3",
             remove_containers=True,
         ),
    ),

    # container image=labhub, volume=shared-docker-volumes
    ('Docker Temp Users',
         'temp docker user',
         'dockerspawner.DockerSpawner',
         dict(
             image="dereneaton/jhub-lab3",
             remove_containers=True,
             volumes={
                 "jhub-user-{username}": "/home/jovyan/work",
                 "data": {
                     "bind": "/home/jovyan/ro-data",
                     "mode": "ro",
                     },
                 }
         ),
    ),
]

c.JupyterHub.hub_ip = c.JupyterHub.ip
c.JupyterHub.cookie_max_age_days = 10
c.JupyterHub.active_server_limit = 30
Step 9. Get Docker Images
Use Docker’s installation instructions to install Docker on your system. Then run the following command to make sure your docker is working.
## run the test image hello-world
docker run hello-world
We are going to want to setup two docker images: one with the basic code to start jupyter notebooks for users, and that details all of the software that we want to make available to users when they login. The first, called singleuser, is easy and can be downloaded with the command below. The second can also be downloaded easily if you want to just copy my setup. I’ll detail in a later post how I created the docker image so you can customize it.
## the image docker will use to start notebooks
docker pull jupyterhub/singleuser

## optionally also pull my docker setup
docker pull dereneaton/jhub-lab3
Finished
You can now start the jupyterhub on your workstation by running:
sudo /opt/miniconda/bin/jupyterhub -f /srv/jupyterhub/jupyter_config.py
Users can then login by visiting your domain address:
Users will have access to a prebuilt set of software tools defined in the
docker image. They will also be located in an isolated linux system so that
they can install additional software as well, for example from
/opt/conda/bin/conda.