<?xml version="1.0" encoding="utf-8"?><feed xmlns="http://www.w3.org/2005/Atom" ><generator uri="https://jekyllrb.com/" version="3.10.0">Jekyll</generator><link href="https://eaton-lab.org/feed.xml" rel="self" type="application/atom+xml" /><link href="https://eaton-lab.org/" rel="alternate" type="text/html" /><updated>2025-07-30T15:56:11+00:00</updated><id>https://eaton-lab.org/feed.xml</id><title type="html">The Eaton Lab at Columbia University</title><subtitle>Botany / Phylogenetics / Bioinformatics</subtitle><entry><title type="html">Latex guide</title><link href="https://eaton-lab.org/articles/latex-guide/" rel="alternate" type="text/html" title="Latex guide" /><published>2020-08-18T00:00:00+00:00</published><updated>2020-08-18T00:00:00+00:00</updated><id>https://eaton-lab.org/articles/latex-guide</id><content type="html" xml:base="https://eaton-lab.org/articles/latex-guide/"><![CDATA[<h3 id="what-is-latex-and-why-use-it">What is latex, and why use it?</h3>
<p>Latex is a coding language for formatting text into a typeset document, such
as a PDF. It is used widely in scientific writing and publishing as a way of 
reusing a design template so that you as the writer can focus on content.
I prefer writing in Latex because it allows me to use coding practices like
git version control, commenting sections of text, and writing
text in a fast and responsive text editor. Most importantly, it also 
makes working with bibtex citations super easy and convenient. Because latex
works seamlessly with git and GitHub it helps me to stay organized by 
creating GitHub repositories for each manuscript, so that me
and my collaborators can all work on a cloud-based document together.</p>

<h3 id="installing-latex">Installing latex</h3>
<p>My instructions below are for Ubuntu Linux, and will work in the Windows 
subsystem for Linux as well. If you are on MacOS I’m sure you can find 
similar installation instructions using google. In your linux bash terminal 
use <code class="language-plaintext highlighter-rouge">apt</code> to install latex with the following command, which may take a 
few minutes to install.</p>

<div class="language-bash highlighter-rouge"><div class="highlight"><pre class="highlight"><code><span class="nb">sudo </span>apt <span class="nb">install </span>texlive-latex-extra
</code></pre></div></div>

<p>That’s it, you are now ready to make a .tex document and compile it with 
latex. In particular, we will use the program <code class="language-plaintext highlighter-rouge">pdflatex</code> to compile tex
files into PDF documents.</p>

<h3 id="compile-your-first-tex-file">Compile your first tex file.</h3>
<p>Open any text editor and create a new file called <code class="language-plaintext highlighter-rouge">hello-world.tex</code> and 
write into it the text below and save the file.</p>

<div class="language-latex highlighter-rouge"><div class="highlight"><pre class="highlight"><code><span class="k">\documentclass</span><span class="p">{</span>article<span class="p">}</span>
<span class="nt">\begin{document}</span>
Hello world 
<span class="nt">\end{document}</span>
</code></pre></div></div>

<p>This is a super simple tex document that includes the very minimum that is
required to compile. The same tex commands are copied below but with additional
notes for each section added by using the comment character (%). The ability
to add comments to your tex files is a really important and powerful component
to writing in latex. Commented lines are not compiled into the PDF. They can
be left in the tex file as notes to yourself or collaborators, or to save 
earlier versions of a text while you are in the process of editing.</p>

<div class="language-latex highlighter-rouge"><div class="highlight"><pre class="highlight"><code><span class="c">% This is a comment.</span>

<span class="c">% The document class sets an overall style for the document </span>
<span class="c">% and is usually the first command in a tex file.</span>
<span class="k">\documentclass</span><span class="p">{</span>article<span class="p">}</span>

<span class="c">% additional add-on packages can be loaded here (see later examples)</span>
<span class="c">% or additional styling options are added here, before beginning the doc.</span>

<span class="c">% This command starts the document. Everything after this is intended to </span>
<span class="c">% be printed into the document (except comments). Everything</span>
<span class="c">% before this involves loading styles and options that will be used in </span>
<span class="c">% this section to style text and images.</span>
<span class="nt">\begin{document}</span>

<span class="c">% This text is part of the document. This comment line however will </span>
<span class="c">% not appear in the document.</span>
Hello world 

<span class="c">% This ends the document. Anything after this will be ignored.</span>
<span class="nt">\end{document}</span>
</code></pre></div></div>

<p>You can now compile the tex document (using either one of the two tex files 
above since they are identical other than comments) by calling the command below 
from your bash terminal. Make sure to reference the full or relative path to
the tex file that you just created. This will print some information to the 
terminal about what it is doing and any errors it encountered. The output
is mostly mumbo jumbo. After it finishes use <code class="language-plaintext highlighter-rouge">ls</code> to look in your current 
directory. You should see a new <code class="language-plaintext highlighter-rouge">hello-world.pdf</code> file containing the typeset
document. A few additional files will also be created which contain errors
or auxiliary information such as citations. You can generally ignore those 
other files.</p>

<div class="language-bash highlighter-rouge"><div class="highlight"><pre class="highlight"><code>pdflatex hello-world.tex
</code></pre></div></div>

<h3 id="setup-latex-with-your-text-editor-eg-sublime">Setup latex with your text editor (e.g., sublime)</h3>
<p>Now that you’ve compiled a tex file from your bash terminal, you can move
to a more advanced setup, which involves compiling the tex file directly 
from your text editor, thus avoiding the additional step of having to 
open a terminal. There are several options for this, including many 
dedicated latex editors/IDEs that are designed specifically to display 
a PDF next to your tex document (and online versions of this like overleaf). 
These can be nice, but I find them overall to be kind of clunky and ugly.</p>

<p>Instead I recommend learning to use latex in a powerful coding text editor
such as sublimetext or vscode. This allows you to learn and use the same 
set of hotkeys and keystrokes to write text efficiently and maneuver around 
lines and paragraphs that you use when writing code.</p>

<p>For sublime text you can find instructions online for how to set it up for 
latex. For me, this involved adding a latex command to the build system to 
compile a .tex file when I press the F7 key. This makes it very easy to edit
the .tex in my editor, press F7, and see the changes in the PDF document.
This can also be setup on Windows as well, where latex is installed in 
your Linux subsystem, but Sublime is installed in Windows, 
<a href="https://guido.vonrudorff.de/2018/latex-on-windows-subsystem-for-linux-in-sublime-text/">instructions here</a>.</p>

<h3 id="using-comments">Using comments</h3>
<p>A benefit of using latex for writing large documents is that you can very 
easily comment out regions of the text that you wish to change, leaving behind
a copy of the unedited version. I use this feature a lot when writing or 
editing. Unlike word or googledocs you don’t need to worry about whether your
edits are easy to read over the previous version, and making lots of edits 
will not lag the system. I leave a copy of the unedited version in a comment
until I’m satisfied it is no longer needed and then remove it.</p>

<h3 id="writing-for-version-control">Writing for version control</h3>
<p>I recommend reading a simple latex tutorial to learn how the latex 
syntax works. For example, similar to markdown, line breaks are ignored
in latex. This is a useful feature for interpreting your text like code.
I always manually break paragraphs into lines that &lt;=80 characters to avoid
line wrapping when working in latex. This makes it so that when you push 
or pull changes with git the changes to each line will be highlighted and 
easy to find. If you write paragraphs as a single unbroken line that is 
wrapped by your editor then you will not be able to find changes in each 
version as easily.</p>

<h3 id="pushing-changes-to-github">Pushing changes to GitHub</h3>
<p>Push changes to git frequently, especially when working with collaborators
to avoid conflicts from arising when you both edit the same text. If 
conflicts do arise, use your text editor to go through one by one the regions
between the <code class="language-plaintext highlighter-rouge">&gt;&gt;&gt;</code> and <code class="language-plaintext highlighter-rouge">&lt;&lt;&lt;</code> markers to select which version of the text 
you wish to keep. Then delete the delimiter markers.</p>

<p>Only commit and push the .tex file to git, not the PDF or auxiliary 
files. You and your collaborators can each compile the PDF anew when
you load the changes to the .tex file. Git is great for versioning 
text-based documents like .tex but not PDFs. Add, commit and push
new changes like below.</p>

<div class="language-bash highlighter-rouge"><div class="highlight"><pre class="highlight"><code><span class="c"># pull in changes from your collaborators</span>
git pull 

<span class="c"># example git commit to push changes to a manuscript</span>
git add hello-world.tex
git commit <span class="nt">-m</span> <span class="s2">"added genomics section to Methods"</span>
git push
</code></pre></div></div>]]></content><author><name>Deren Eaton</name><email>de2356@columbia.edu</email></author><category term="articles" /><category term="latex" /><category term="writing" /><summary type="html"><![CDATA[Latex writing guide]]></summary><media:thumbnail xmlns:media="http://search.yahoo.com/mrss/" url="https://eaton-lab.org/%7B%22feature%22=%3E%22header_ped.png%22%7D" /><media:content medium="image" url="https://eaton-lab.org/%7B%22feature%22=%3E%22header_ped.png%22%7D" xmlns:media="http://search.yahoo.com/mrss/" /></entry><entry><title type="html">Conda guide (updated)</title><link href="https://eaton-lab.org/articles/conda-guide/" rel="alternate" type="text/html" title="Conda guide (updated)" /><published>2020-08-17T00:00:00+00:00</published><updated>2020-08-17T00:00:00+00:00</updated><id>https://eaton-lab.org/articles/conda-guide</id><content type="html" xml:base="https://eaton-lab.org/articles/conda-guide/"><![CDATA[<h3 id="updated-conda-installation-instructions">Updated conda installation instructions</h3>
<p>Conda is a work in progress, and the best practices evolve quickly. This is 
my current recommended best practice, aimed at avoiding conflicts among 
packages, and preventing the need for total reinstallations.</p>

<h3 id="fresh-installation">Fresh installation</h3>
<p>Download the latest Miniconda3 and install into your home directory.</p>

<div class="language-bash highlighter-rouge"><div class="highlight"><pre class="highlight"><code><span class="c"># download latest 64-bit Py3 installation</span>
wget https://repo.anaconda.com/miniconda/Miniconda3-latest-Linux-x86_64.sh
</code></pre></div></div>

<div class="language-bash highlighter-rouge"><div class="highlight"><pre class="highlight"><code><span class="c"># install in batch mode</span>
bash Miniconda3-latest-Linux-x86_64 <span class="nt">-b</span> 
</code></pre></div></div>

<p>If conda is not yet in your path (e.g., this is your first time installing)
then add it your path by calling:</p>
<div class="language-bash highlighter-rouge"><div class="highlight"><pre class="highlight"><code>~/miniconda3/condabin/conda init
</code></pre></div></div>

<h3 id="create-a-working-environment">Create a working environment</h3>
<p>It is best not to install additional packages into your base environment. 
Instead, create one or more environments. I’ll create an environment using 
Python 3.7 since 3.8 is not yet widely supported.</p>

<div class="language-bash highlighter-rouge"><div class="highlight"><pre class="highlight"><code>conda create <span class="nt">-n</span> py37 <span class="nv">Python</span><span class="o">=</span>3.7
</code></pre></div></div>

<div class="language-bash highlighter-rouge"><div class="highlight"><pre class="highlight"><code>conda activate py37
</code></pre></div></div>

<h3 id="add-conda-forge-as-your-constant-default-channel">Add conda-forge as your <em>constant</em> default channel</h3>
<p>Remember that the order in which you list channels is important, since the 
they are checked in order to choose priority. It is best to install all packages from the same channel as much as possible to reduce conflicts. 
Conda-forge is the most expansive channel that also has the latest updates. 
Even if you need to install a package that is on bioconda, it is best to list
conda-forge <em>before</em> bioconda so that any dependencies of the bioconda package will be pulled in from conda-forge.</p>

<div class="language-bash highlighter-rouge"><div class="highlight"><pre class="highlight"><code>conda config <span class="nt">--add</span> channels conda-forge
conda config <span class="nt">--set</span> channel_priority <span class="nb">true</span>
</code></pre></div></div>

<h3 id="installation-of-local-software">Installation of local software</h3>

<p>When you are doing development you often want to install software locally
with pip so that you can incorporate changes in your code instantly into your
development environment. I recommend doing this with the option <code class="language-plaintext highlighter-rouge">--no-deps</code> like below to ensure you do not accidentally install dependencies with pip, 
since this can cause conflict problems. Here is an example with <code class="language-plaintext highlighter-rouge">ipyrad</code> 
cloned from github.</p>

<div class="language-bash highlighter-rouge"><div class="highlight"><pre class="highlight"><code><span class="c"># install ipyrad from conda to get all dependencies</span>
conda <span class="nb">install </span>ipyrad <span class="nt">-c</span> conda-forge <span class="nt">-c</span> bioconda

<span class="c"># clone the ipyrad repo to get git development version</span>
git clone https://github.com/dereneaton/ipyrad.git

<span class="c"># cd into the repo</span>
<span class="nb">cd </span>ipyrad/

<span class="c"># do local pip install (-e) with --no-deps </span>
pip <span class="nb">install</span> <span class="nt">-e</span> <span class="nb">.</span> <span class="nt">--no-deps</span>
</code></pre></div></div>]]></content><author><name>Deren Eaton</name><email>de2356@columbia.edu</email></author><category term="articles" /><category term="jupyter" /><category term="pinky" /><category term="conda" /><summary type="html"><![CDATA[Updated conda workflow]]></summary><media:thumbnail xmlns:media="http://search.yahoo.com/mrss/" url="https://eaton-lab.org/%7B%22feature%22=%3E%22header_ped.png%22%7D" /><media:content medium="image" url="https://eaton-lab.org/%7B%22feature%22=%3E%22header_ped.png%22%7D" xmlns:media="http://search.yahoo.com/mrss/" /></entry><entry><title type="html">Eaton lab server guide</title><link href="https://eaton-lab.org/articles/pinky-login/" rel="alternate" type="text/html" title="Eaton lab server guide" /><published>2020-04-19T00:00:00+00:00</published><updated>2020-04-19T00:00:00+00:00</updated><id>https://eaton-lab.org/articles/pinky-login</id><content type="html" xml:base="https://eaton-lab.org/articles/pinky-login/"><![CDATA[<h1 id="connecting-to-pinky">Connecting to pinky</h1>
<p>This guide will walk you through the recommended steps to get set up 
for using the <code class="language-plaintext highlighter-rouge">pinky</code> server and for following shared use best practices.</p>

<h3 id="1-request-access">1. request access</h3>
<p>Write to Deren to request a username and password to be setup 
for you on pinky.</p>

<h3 id="2-create-a-github-account">2. Create a GitHub account</h3>
<p>If you don’t yet have one, create an account.</p>

<h3 id="3-generate-a-public-ssh-key">3. generate a public SSH key</h3>
<!-- You need a GitHub account.  -->
<p>On your laptop run the command below to generate a private and public key
pair. This will request that you enter a passphrase, if you want you can just
hit enter to leave the passphrase blank. This will generate two files placed
in your <code class="language-plaintext highlighter-rouge">~/.ssh</code> folder. The private key stays on your laptop and the public key will be sent to pinky so that the two files can be matched up
when you try to connect.</p>
<div class="language-bash highlighter-rouge"><div class="highlight"><pre class="highlight"><code>ssh-keygen <span class="nt">-t</span> rsa <span class="nt">-b</span> 4096 <span class="nt">-C</span> <span class="s2">"deren@sacra"</span>
</code></pre></div></div>

<h3 id="4-upload-your-public-ssh-key-to-your-github-account">4. upload your public SSH key to your GitHub account</h3>
<p>Your public key can be shared publicly, and used for a variety of security
purposes. To ensure that you do not lose it I recommend uploading it to 
your GitHub account. Follow the instructions here: <a href="https://jdblischak.github.io/2014-09-18-chicago/novice/git/05-sshkeys.html">https://jdblischak.github.io/2014-09-18-chicago/novice/git/05-sshkeys.html</a>.
Once your key is uploaded send Deren an email with your GitHub 
username and he will pull your public key onto pinky so that you 
will be able to login.</p>

<h3 id="5-setup-your-laptop-for-easy-ssh-login">5. setup your laptop for easy ssh login</h3>
<p>Next edit your SSH config file on your laptop to create a shortcut name to 
reference the pinky server. This makes it so that you do not need to write
out the full IP address and username when you login. Replace the {username}
with your own name in lower case (e.g., deren) without brackets.</p>
<div class="language-bash highlighter-rouge"><div class="highlight"><pre class="highlight"><code><span class="c"># nickname the server pinky (ENTER YOUR USERNAME w/o brackets)</span>
<span class="nb">touch</span> ~/.ssh/config
<span class="nb">echo</span> <span class="nt">-e</span> <span class="s2">"
Host pinky
    Hostname 128.59.23.200
    User {username}
"</span> <span class="o">&gt;</span> ~/.ssh/config
</code></pre></div></div>

<p>Finally, you can now login to pinky from your terminal by just typing:</p>
<div class="language-bash highlighter-rouge"><div class="highlight"><pre class="highlight"><code>ssh pinky
</code></pre></div></div>]]></content><author><name>Deren Eaton</name><email>de2356@columbia.edu</email></author><category term="articles" /><category term="jupyter" /><category term="pinky" /><category term="conda" /><category term="ssh" /><summary type="html"><![CDATA[New user setup]]></summary><media:thumbnail xmlns:media="http://search.yahoo.com/mrss/" url="https://eaton-lab.org/%7B%22feature%22=%3E%22header_ped.png%22%7D" /><media:content medium="image" url="https://eaton-lab.org/%7B%22feature%22=%3E%22header_ped.png%22%7D" xmlns:media="http://search.yahoo.com/mrss/" /></entry><entry><title type="html">Assembling a plant genome on google cloud</title><link href="https://eaton-lab.org/articles/gcloud-project/" rel="alternate" type="text/html" title="Assembling a plant genome on google cloud" /><published>2019-11-24T00:00:00+00:00</published><updated>2019-11-24T00:00:00+00:00</updated><id>https://eaton-lab.org/articles/gcloud-project</id><content type="html" xml:base="https://eaton-lab.org/articles/gcloud-project/"><![CDATA[<h3 id="assembling-a-plant-genome-with-nanopore-data">Assembling a plant genome with nanopore data</h3>
<p>Our goal is to assemble a genome for the flowering plant <em>Pedicularis cranolopha</em>. We originally estimated the genome size to be 1-2Gb and generated ~180Gb of Illumina PE 150bp reads, 250Gb of nanopore reads (avg. read len ~30Kb) and ~350Gb of PE 150bp Illumina Hi-C data in addition to XXGb of RNA-seq data for genome annotation. Here I will focus on how we setup a google cloud instance for genome assembly using <em>canu</em> and <em>shasta</em>.</p>

<h3 id="setup-a-google-cloud-computing-project">Setup a google cloud computing project</h3>
<p>Log into <a href="https://console.cloud.google.com/">https://console.cloud.google.com/</a> to create a free account (you may be eligible for free academic credits). Then create a new project. Ours is called “liuliu”. My postdoc Jianjun Jin who is leading the bioinformatics for this project also created a personal account and I added him under the IAM section as a project “owner” to have full permissions.</p>

<h3 id="create-a-storage-bucket">Create a storage bucket</h3>
<p>gs storage buckets are convenient for storing data long term as well as for transfering files between different locations. I backed up all of our data onto a bucket which takes up about 500Gb of space. You can create a bucket from the dropdown toolbar in the upper left corner: find “storage”, then “storage” again to open the bucket storage page. There you can create a new bucket or modify existing buckets to set access rights. The bucket with our genome data is called “liuliu”. This is where we will store the raw data.</p>

<h3 id="setup-gcloud-and-gsutil-to-transfer-data-to-gcloud">Setup <code class="language-plaintext highlighter-rouge">gcloud</code> and <code class="language-plaintext highlighter-rouge">gsutil</code> to transfer data to gcloud</h3>
<p>I followed instructions from here to install and setup the gsutil tool on my local computer where the raw data is saved: <a href="https://cloud.google.com/storage/docs/gsutil_install#linux">https://cloud.google.com/storage/docs/gsutil_install#linux</a>. The init command allows you to securely connect to gcloud using google authenticator in your browser.</p>

<div class="language-bash highlighter-rouge"><div class="highlight"><pre class="highlight"><code><span class="c"># Enter the following at a command prompt:</span>
curl https://sdk.cloud.google.com | bash

<span class="c"># Restart your shell:</span>
<span class="nb">exec</span> <span class="nt">-l</span> <span class="nv">$SHELL</span>

<span class="c"># Run gcloud init to initialize the gcloud environment:</span>
gcloud init
</code></pre></div></div>

<h3 id="copy-data-to-the-bucket">Copy data to the bucket</h3>
<p>Once you are logged in you can see the available buckets visible to your account using the following command on your local machine:</p>
<div class="language-bash highlighter-rouge"><div class="highlight"><pre class="highlight"><code>gsutil <span class="nb">ls</span> <span class="nt">-l</span>
</code></pre></div></div>

<p>And then transfer local files to the cloud bucket using the <code class="language-plaintext highlighter-rouge">cp</code> command on your local machine:</p>
<div class="language-bash highlighter-rouge"><div class="highlight"><pre class="highlight"><code>gsutil <span class="nb">cp </span>file.txt gs://liuliu
</code></pre></div></div>

<h3 id="create-a-hard-disk-on-gcloud">Create a hard disk on gcloud</h3>
<p>A persistent disk can be used like a scratch drive on an HPC system to store processed data such as temporary files created during the genome assembly. According to the canu documentation you should have ~3 Tb of free disk space for a mammal or human-sized genome, but up to 10-20Tb for a highly repetitive genome such as a plant. Our genome size is estimated to be smaller than human (~1G) and not particularly repetitive (~2%) based on kmer statistics, so I created a 6Tb disk to be safe. When finished with the assembly we will transfer the long-term data files back to the storage bucket and delete disk. The disk was created by selecting from the toolbar “Compute Engine” and then “disks” and I named it “scratch”.</p>

<h3 id="starting-an-instance-and-format-the-scratch-disk">Starting an instance and format the scratch disk</h3>
<p>I created an instance (named assembly) in project liuliu that boots an Ubuntu 19.04  from a 10Gb disk and has the 6Tb ‘scratch’ disk attached containing the raw data. The instance (for now) is 32vCPUs and 120Gb of disk. This seems like a reasonable amount of resources for our initial analyses with <em>canu</em>, which requires only about 16Gb per node. We will want more RAM for later <em>shasta</em> assembly, and we can stop and edit the instance at any time later to change the resources.</p>

<p>Once the instance has started I then connect to it with SSH. I followed instructions to format and mount the scratch disk on the compute instance <a href="https://cloud.google.com/compute/docs/disks/add-persistent-disk?hl=en_US&amp;_ga=2.182920166.-1380307473.1566255256#formatting">here</a>.</p>

<div class="language-bash highlighter-rouge"><div class="highlight"><pre class="highlight"><code><span class="c"># on the assembly instance</span>
<span class="nb">sudo </span>mkfs.ext4 <span class="nt">-m</span> 0 <span class="nt">-F</span> <span class="nt">-E</span> <span class="nv">lazy_itable_init</span><span class="o">=</span>0,lazy_journal_init<span class="o">=</span>0,discard /dev/sdb
<span class="nb">sudo mkdir</span> <span class="nt">-p</span> /scratch
<span class="nb">sudo </span>mount <span class="nt">-o</span> discard,defaults /dev/sdb /scratch/
<span class="nb">sudo chmod </span>a+w /scratch

<span class="c"># set to re-attach on restart of instance</span>
<span class="nb">sudo cp</span> /etc/fstab /etc/fstab.backup
<span class="nb">echo </span><span class="nv">UUID</span><span class="o">=</span><span class="sb">`</span><span class="nb">sudo </span>blkid <span class="nt">-s</span> UUID <span class="nt">-o</span> value /dev/sdb<span class="sb">`</span> /scratch/ ext4 discard,defaults,nofail 0 2 | <span class="nb">sudo tee</span> <span class="nt">-a</span> /etc/fstab
</code></pre></div></div>

<h3 id="transfer-raw-data-to-the-scratch-disk">Transfer raw data to the scratch disk</h3>
<p>Copied from the bucket to the scratch dir for faster i/o access.</p>
<div class="language-bash highlighter-rouge"><div class="highlight"><pre class="highlight"><code>gsutil <span class="nt">-m</span> <span class="nb">cp</span> <span class="nt">-r</span> gs://liuliu/2019-11-15-Liuliu-shasta/ <span class="nb">.</span>
</code></pre></div></div>

<h3 id="install-canu-from-source">Install canu from source</h3>
<p>To install <em>canu’s</em> dependencies and ensure binaries are accessible to all users I installed <em>canu</em> into the <code class="language-plaintext highlighter-rouge">/opt/conda/bin</code> directory.</p>

<div class="language-bash highlighter-rouge"><div class="highlight"><pre class="highlight"><code><span class="c"># install conda in /opt/ so it is available to all users</span>
<span class="nb">cd
sudo </span>bash Miniconda3-latest-Linux-x86_64 <span class="nt">-p</span> /opt/conda <span class="nt">-b</span>

<span class="c"># activate conda in path so that dependencies are found (e.g., java).</span>
<span class="nb">source</span> /opt/conda/bin/activate
conda init
<span class="nb">exec</span> <span class="nt">-l</span> <span class="nv">$SHELL</span>

<span class="c"># install with conda</span>
<span class="nb">sudo </span>conda <span class="nb">install </span><span class="nv">canu</span><span class="o">=</span>1.9 <span class="nt">-c</span> bioconda <span class="nt">-c</span> conda-forge
</code></pre></div></div>

<h3 id="clean-and-trim-nanopore-reads-with-canu">Clean and trim nanopore reads with canu</h3>
<p>This is what we plan to run first (do we need to run the correct and trim steps multiple times?). Then we will probably try a fast shasta assembly of the trimmed and cleaned reads. Then if that goes well we will start a canu assembly as well. The shasta assembly will probably require changing the instance to a high mem node.</p>

<div class="language-bash highlighter-rouge"><div class="highlight"><pre class="highlight"><code><span class="c"># correct errors in reads (32 cores 128Gb RAM)</span>
canu <span class="nt">-correct</span> <span class="se">\</span>
  <span class="nt">-p</span> liuliu <span class="se">\</span>
  <span class="nt">-d</span> /scratch/canu-correct/ <span class="se">\</span>
  <span class="nv">genomeSize</span><span class="o">=</span>1g <span class="se">\</span>
  <span class="nv">correctedErrorRate</span><span class="o">=</span>0.12 <span class="se">\</span>
  <span class="nv">corMaxEvidenceErate</span><span class="o">=</span>0.15 <span class="se">\</span>
  <span class="nv">minReadLength</span><span class="o">=</span>1000 <span class="se">\</span>
  <span class="nv">minOverlapLength</span><span class="o">=</span>500 <span class="se">\</span>
  <span class="nt">-nanopore-raw</span> /liuliu/2019-11-15-Liuliu-shasta/S3<span class="k">*</span>.fastq

<span class="c"># trim adapters and low quality (up to 64 cores node)</span>
canu <span class="nt">-trim</span> <span class="se">\</span>
  <span class="nt">-p</span> liuliu <span class="se">\</span>
  <span class="nt">-d</span> /scratch/canu-trim/ <span class="se">\</span>
  <span class="nv">genomeSize</span><span class="o">=</span>1g <span class="se">\</span>
  <span class="nv">correctedErrorRate</span><span class="o">=</span>0.12 <span class="se">\</span>
  <span class="nv">corMaxEvidenceErate</span><span class="o">=</span>0.15 <span class="se">\</span>
  <span class="nv">minReadLength</span><span class="o">=</span>1000 <span class="se">\</span>
  <span class="nv">minOverlapLength</span><span class="o">=</span>500 <span class="se">\</span>
  <span class="nt">-nanopore-corrected</span> /scratch/canu-correct/S3<span class="k">*</span>correctedReads.fasta.gz

<span class="c"># assemble at two different stringencies (use 96 core node)</span>
canu <span class="nt">-assemble</span> <span class="se">\</span>
  <span class="nt">-p</span> liuliu <span class="se">\</span>
  <span class="nt">-d</span> /scratch/canu-assembly-err0.12 <span class="se">\</span>
  <span class="nv">genomeSize</span><span class="o">=</span>1.5g <span class="se">\</span>
  <span class="nv">correctedErrorRate</span><span class="o">=</span>0.12 <span class="se">\</span>
  <span class="nt">-nanopore-corrected</span> /scratch/canu-trim/S3<span class="k">*</span>trimmedReads.fasta.gz

canu <span class="nt">-assemble</span> <span class="se">\</span>
  <span class="nt">-p</span> liuliu <span class="se">\</span>
  <span class="nt">-d</span> /scratch/canu-assembly-err0.05 <span class="se">\</span>
  <span class="nv">genomeSize</span><span class="o">=</span>1.5g <span class="se">\</span>
  <span class="nv">correctedErrorRate</span><span class="o">=</span>0.05 <span class="se">\</span>
  <span class="nt">-nanopore-corrected</span> /scratch/canu-trim/S3<span class="k">*</span>trimmedReads.fasta.gz
</code></pre></div></div>

<h3 id="canu-tips-for-plant-genomes">Canu tips for plant genomes</h3>
<p><a href="https://canu.readthedocs.io/en/latest/faq.html#my-genome-is-at-or-gc-rich-do-i-need-to-adjust-parameters-what-about-highly-repetitive-genomes">For repetive genomes</a> such as plants do this in canu:
<code class="language-plaintext highlighter-rouge">corMaxEvidenceErate=0.15</code></p>

<p><a href="https://canu.readthedocs.io/en/latest/faq.html#what-parameters-can-i-tweak">What can be tweaked in canu</a></p>

<p>For high coverage data this makes it faster:
<code class="language-plaintext highlighter-rouge">correctedErrorRate=0.12</code></p>

<p>Discard short reads (default=1000).
<code class="language-plaintext highlighter-rouge">minReadLength=10000</code></p>

<p>Don’t look for overlaps shorter than 500bp (default=500)
<code class="language-plaintext highlighter-rouge">minOverlapLength=500bp</code></p>

<h3 id="in-progress-">IN PROGRESS …</h3>

<h3 id="install-shasta-from-source">Install shasta from source</h3>
<p>For best performance build it on the machine (instance) that we plan to use for the assembly (high memory node instance). This takes about 10 minutes to 
install: https://chanzuckerberg.github.io/shasta/BuildingFromSource.html
Or, to build a version that is transferrable between machines add the following flag to the cmake call: <code class="language-plaintext highlighter-rouge">-DBUILD_NATIVE=OFF</code>.</p>]]></content><author><name>Deren Eaton</name><email>de2356@columbia.edu</email></author><category term="articles" /><category term="HPC" /><category term="google" /><category term="gcloud" /><category term="Server" /><category term="Linux" /><category term="SSH" /><summary type="html"><![CDATA[gsutils, buckets, instances.]]></summary><media:thumbnail xmlns:media="http://search.yahoo.com/mrss/" url="https://eaton-lab.org/%7B%22feature%22=%3E%22header_ped.png%22%7D" /><media:content medium="image" url="https://eaton-lab.org/%7B%22feature%22=%3E%22header_ped.png%22%7D" xmlns:media="http://search.yahoo.com/mrss/" /></entry><entry><title type="html">Login to HPC passwordless</title><link href="https://eaton-lab.org/articles/login-to-HPC-easily/" rel="alternate" type="text/html" title="Login to HPC passwordless" /><published>2019-11-19T00:00:00+00:00</published><updated>2019-11-19T00:00:00+00:00</updated><id>https://eaton-lab.org/articles/login-to-HPC-easily</id><content type="html" xml:base="https://eaton-lab.org/articles/login-to-HPC-easily/"><![CDATA[<h2 id="set-up-a-shortcut-to-login-by-ssh">Set up a shortcut to login by SSH</h2>
<p>In a linux or OSX terminal you will have a hidden directory in HOME called <code class="language-plaintext highlighter-rouge">~.ssh</code>
which contains files for setting preferences or login credentials to make it simpler
and faster to login to remote systems. Let’s start by setting a shortcut for 
the two clusters at Columbia in a file called <code class="language-plaintext highlighter-rouge">~.ssh/config</code>. The code below 
shows the typical longform SSH login command and the shorter version that we will
be able to use once you setup your config file.</p>

<div class="language-bash highlighter-rouge"><div class="highlight"><pre class="highlight"><code><span class="c"># what you do now</span>
ssh username@habanero.rcs.columbia.edu

<span class="c"># what you want to be able to do</span>
ssh habanero
</code></pre></div></div>

<p>To setup the config file use a text editor like nano to create and edit the config
file by calling <code class="language-plaintext highlighter-rouge">nano ~/.ssh/config</code> and then enter the following being sure to 
<strong>replace USERNAME with your actual username</strong>.</p>

<div class="language-bash highlighter-rouge"><div class="highlight"><pre class="highlight"><code>Host habanero
    Hostname habanero.rcs.columbia.edu
    User USERNAME

Host moto
    Hostname moto.rcs.columbia.edu
    User USERNAME
</code></pre></div></div>

<h2 id="setup-passwordless-login">Setup passwordless login</h2>
<p>Great, now that we can call the command to login to the cluster more easily let’s
also make it so that you do not need to enter a password. We can do this by sharing
SSH credentials between your laptop and the cluster. This is a two-step process.</p>

<h4 id="1-generate-an-ssh-key">1. Generate an SSH key</h4>
<p>Enter your email address here of course. This will prompt you to enter a password
for which you should enter the password you wish to use to login to the cluster
(you can set this to not ask later).</p>
<div class="language-bash highlighter-rouge"><div class="highlight"><pre class="highlight"><code>ssh-keygen <span class="nt">-t</span> rsa <span class="nt">-b</span> 4096 <span class="nt">-C</span> <span class="s2">"user@email.org"</span>
</code></pre></div></div>

<h4 id="2-send-ssh-key-to-the-hpc">2. Send SSH key to the HPC</h4>
<p>Now we send the key to the cluster.</p>
<div class="language-bash highlighter-rouge"><div class="highlight"><pre class="highlight"><code>ssh-copy-id <span class="nt">-i</span> ~/.ssh/id_rsa.pub habanero
</code></pre></div></div>

<p>And repeat for the other cluster.</p>
<div class="language-bash highlighter-rouge"><div class="highlight"><pre class="highlight"><code>ssh-copy-id <span class="nt">-i</span> ~/.ssh/id_rsa.pub moto
</code></pre></div></div>

<p>That’s it. You should now be able to login more efficiently.</p>]]></content><author><name>Deren Eaton</name><email>de2356@columbia.edu</email></author><category term="articles" /><category term="HPC" /><category term="Server" /><category term="Linux" /><category term="SSH" /><summary type="html"><![CDATA[Save yourself 30 seconds every day.]]></summary><media:thumbnail xmlns:media="http://search.yahoo.com/mrss/" url="https://eaton-lab.org/%7B%22feature%22=%3E%22header_ped.png%22%7D" /><media:content medium="image" url="https://eaton-lab.org/%7B%22feature%22=%3E%22header_ped.png%22%7D" xmlns:media="http://search.yahoo.com/mrss/" /></entry><entry><title type="html">Evolution 2019</title><link href="https://eaton-lab.org/posts/evolution-2019/" rel="alternate" type="text/html" title="Evolution 2019" /><published>2019-06-24T00:00:00+00:00</published><updated>2019-06-24T00:00:00+00:00</updated><id>https://eaton-lab.org/posts/evolution-2019</id><content type="html" xml:base="https://eaton-lab.org/posts/evolution-2019/"><![CDATA[<h4 id="the-crew">The crew</h4>

<p>
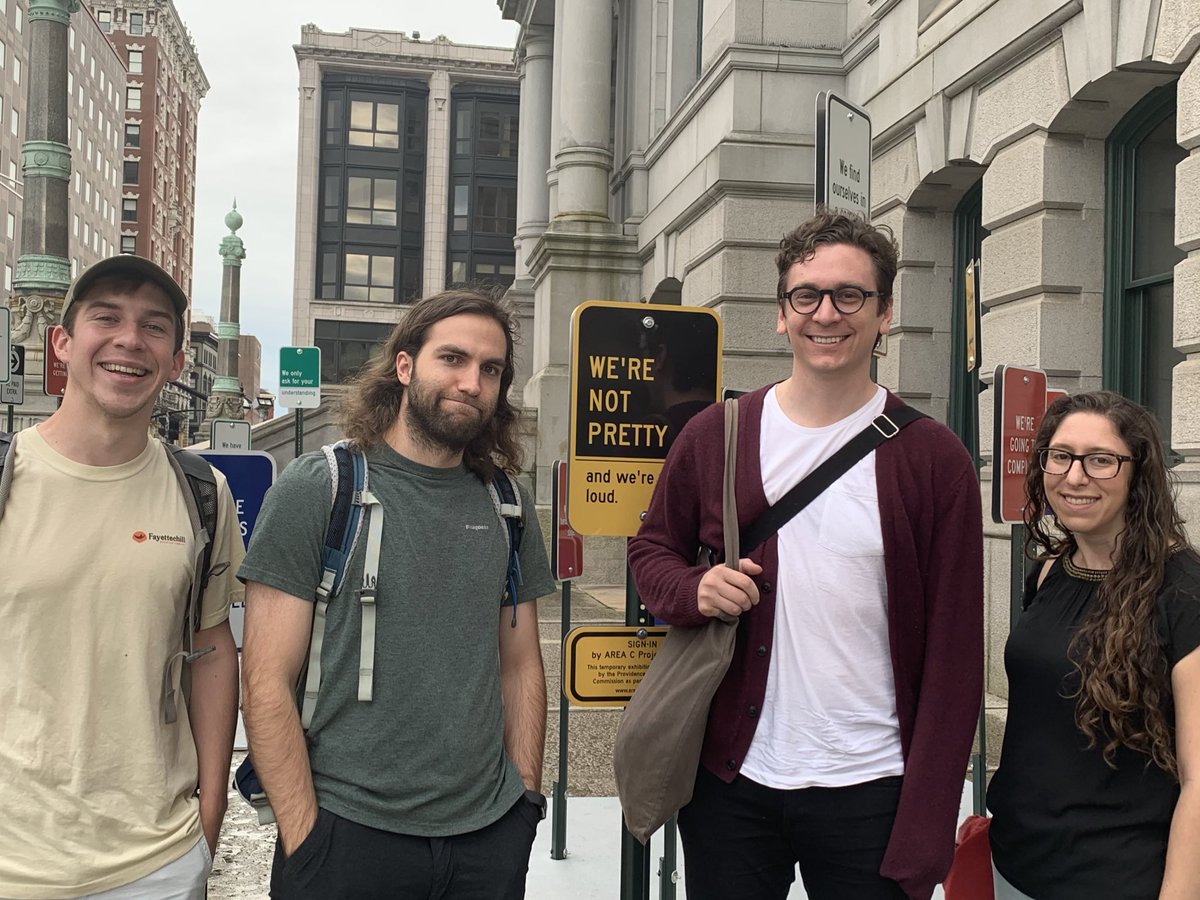
The Eaton lab is at Evolution 2019. Pictured from left to right are 
graduate students Patrick McKenzie and Jared Meek, then myself, and postdoc
Sandra Hoffberg. If you see us at the conference come say hi.
<br /></p>

<figure>
	<a href="https://pbs.twimg.com/media/D9oghuLXYAE1UYE.jpg">
		<img src="https://pbs.twimg.com/media/D9oghuLXYAE1UYE.jpg" alt="lab image" />
	</a>
</figure>

<h4 id="talk-slides">Talk slides</h4>

<p>In case you missed my talk, or saw it and want to revisit the slides, you can 
access an online version here of the slides <a href="https://eaton-lab.org/slides/2019-Evolution/index.html">here</a>.</p>]]></content><author><name>Deren Eaton</name><email>de2356@columbia.edu</email></author><category term="posts" /><category term="Evolution" /><category term="Columbia. E3B" /><summary type="html"><![CDATA[The Eaton-lab goes to Providence]]></summary><media:thumbnail xmlns:media="http://search.yahoo.com/mrss/" url="https://eaton-lab.org/%7B%22feature%22=%3E%22header_ped.png%22%7D" /><media:content medium="image" url="https://eaton-lab.org/%7B%22feature%22=%3E%22header_ped.png%22%7D" xmlns:media="http://search.yahoo.com/mrss/" /></entry><entry><title type="html">Hosting a jupyterhub server on a static website</title><link href="https://eaton-lab.org/articles/setup-jupyterhub/" rel="alternate" type="text/html" title="Hosting a jupyterhub server on a static website" /><published>2019-06-24T00:00:00+00:00</published><updated>2019-06-24T00:00:00+00:00</updated><id>https://eaton-lab.org/articles/setup-jupyterhub</id><content type="html" xml:base="https://eaton-lab.org/articles/setup-jupyterhub/"><![CDATA[<h4 id="the-problem">The problem</h4>
<p>As a biologist and instructor working in computational genomics I frequently 
teach workshops and classes aimed at introducing new computational methods 
that draw on a variety of computer languages and software. And, as anyone who 
teaches computational methods knows well, the most difficult part of running
a workshop is troubleshooting installation problems on the varied computers of participants (that one person with a chromebook, or Windows 95); 
a task that feels particularly thankless when only teaching a one-time workshop. An alternative strategy that would allow participants to jump straight into learning code on a system with all requirements pre-installed can save a ton of time.</p>

<h4 id="a-convenient-solution">A convenient solution</h4>
<p>I love teaching with jupyter notebooks and so I will focus on setting up an environment that easily allows users to connect to pre-loaded tutorial notebooks, and to modify their environment (e.g., install more software) if needed. After trying many different solutions (HPC accounts, collaboratory, binder), I’ve settled on hosting a jupyterhub from my lab workstation as my favorite option. This post describes how I set this up and why I think it’s 
great. I provide instructions so others can replicate or improve this setup, and to document the steps involved (so I can remember them!).</p>

<h4 id="jupyterhub">Jupyterhub</h4>
<p>My jupyterhub server is accessible from my lab website 
(<a href="https://eaton-lab.org">https://eaton-lab.org</a>) on a subdomain 
(<a href="https://jhub.eaton-lab.org">https://jhub.eaton-lab.org</a>). The site itself 
is a simple static site hosted on github, which anyone can set up for free, 
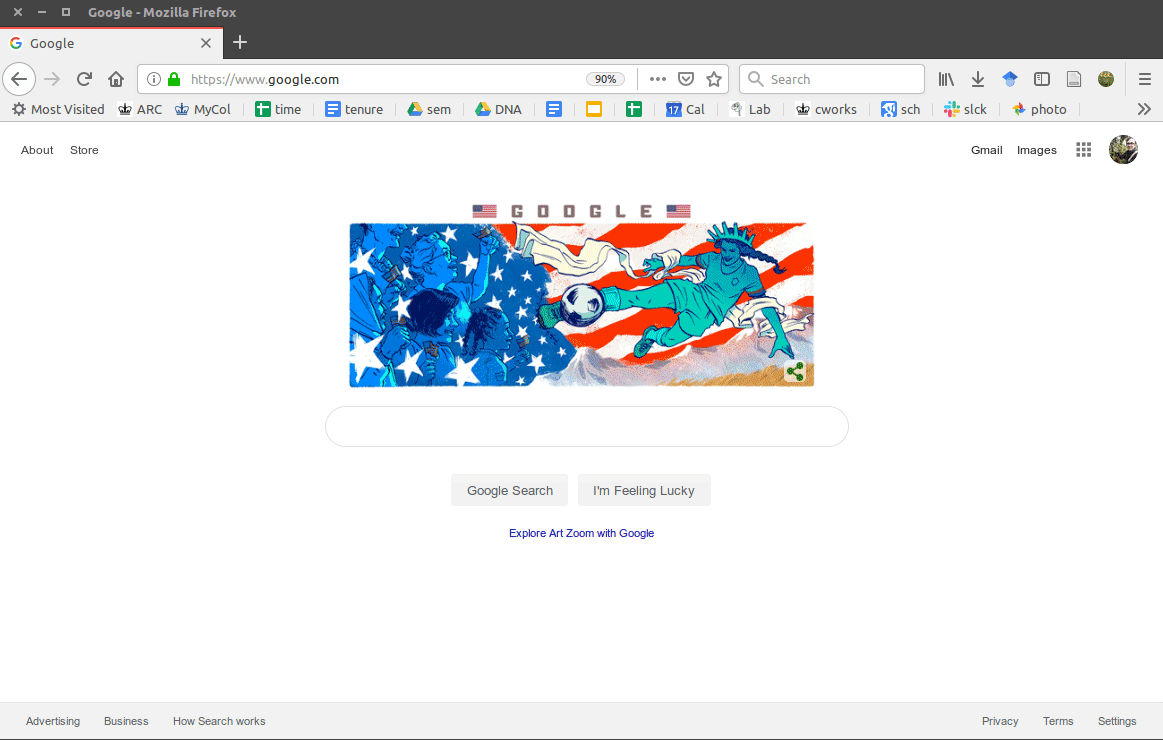
and the domain name costs $12/year. No matter what computer you are using (even a phone) you can connect and login to this URL and connect directly to a jupyter notebook. The GIF below demonstrates the general idea:</p>

<figure>
	<a href="https://eaton-lab.org/images/jhub-login-example2.gif">
		<img src="https://eaton-lab.org/images/jhub-login-example2.gif" alt="jhub login GIF" /></a>
</figure>

<p>The key steps involved are <strong>(1)</strong> deciding how to 
authenticate users (e.g., passwords versus external authenticators like 
Google or GitHub); <strong>(2)</strong> setting up SSL so that authentication data is encrypted; and <strong>(3)</strong> setting up user accounts. The latter task can be done in a number of ways: for example, you can make separate accounts for each user on the workstation/computer running the server, or, you can sandbox users inside docker containers (or kubernetes, or similar alternatives).</p>

<p>I set up Docker containers as I found it was the easiest solution to allow both long-term users (e.g., lab members) and temporary users (e.g., workshop 
participants) to both use the system safely. Docker also allows me to provide 
pre-installed software, while also allowing users to install additional 
software into their own isolated and persistent containers. Finally, for 
temporary users, I can easily clean up and remove their containers when the 
workshop or class is finished.</p>

<h4 id="jupyterhub-requirements">jupyterhub requirements</h4>
<p>My setup is based on the <a href="https://zero-to-jupyterhub.readthedocs.io/en/latest/">zero to jupyterhub</a> tutorial, 
but I deviated from these instructions a bit as well. For me, it was important
to set up the software environment how I wanted it, and to host the server
locally, not on a paid amazon server or the like. I’ve 
tried to distil the instructions from there to further explain the sections 
that I found most confusing given my limited experience with networking. Here
is what we will need to get started:</p>

<ol>
	<li><b>A linux/unix system</b> -- (in my case Ubuntu.)</li>
	<li><b>Python 3.4 or greater</b> -- (we'll install a Py37 conda env.)</li>
    <li><b>A static IP address</b> -- (easy to get.)</li>	
	<li><b>TLS certificate and key</b> (easy to get.)</li>
	<li><b>Domain name</b> (purchase, get from your institution, or use free options.)</li>
</ol>

<h4 id="step-1-get-a-static-ip-address-for-your-server">Step 1. Get a static IP address for your server</h4>
<p>If you are at a University you can ask your IT department to set up a static 
IP address for you. They will send it to you in an email. Otherwise 
google “how to get a static IP”. It is the IP address you will run your server 
from.</p>

<h4 id="step-2-register-a-domain-and-subdomain">Step 2. Register a domain and subdomain</h4>
<p>My lab website is hosted by GitHub using their free service for hosting static 
sites. These are easy to set up by placing a bit of code into a GitHub 
repository. In order to link this site (<code class="language-plaintext highlighter-rouge">eaton-lab.github.io</code>) to 
a jupythub server, however, I needed a domain name that I could control.
So I purchased the domain <code class="language-plaintext highlighter-rouge">eaton-lab.org</code> from google domains ($12/year), 
and set it up to forward my GitHub site to the new domain. I explain below
how to do this. If you’re on a tight budget there are free services for 
getting a domain (<a href="https://www.noip.com/">https://www.noip.com/</a>), 
which worked for me just fine when I was first testing this out.</p>

<p>To set up domain forwarding for a GitHub site go to settings in the GitHub 
repository for your site and set the “custom domain” to your new domain name. 
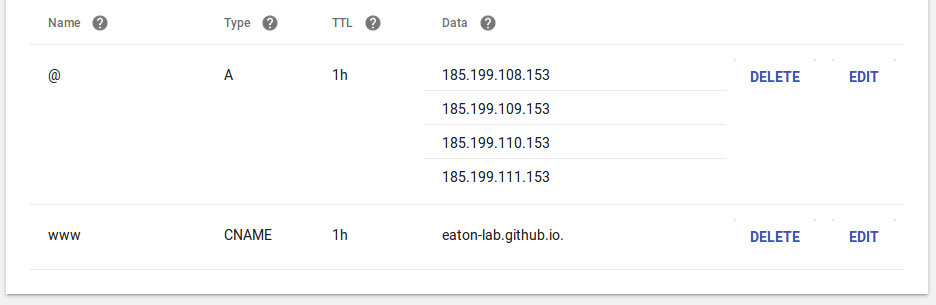
Then go to the DNS settings on domains.google.com, or where ever your domain
is hosted, and enter the GitHub IP address as the A record like below (just 
enter the same values I did below), and then enter the GitHub domain address 
as the CNAME record.</p>

<figure>
	<a href="https://eaton-lab.org/images/jhub-domain.png">
		<img src="https://eaton-lab.org/images/jhub-domain.png" alt="image" /></a>
</figure>

<p>Your GitHub site will now be served on the domain name that your purchased 
(it takes a few minutes to sync). I then set up my jupyterhub server to be 
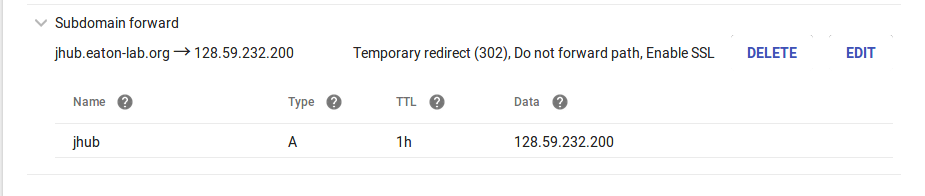
accessible from this site on a subdomain (<code class="language-plaintext highlighter-rouge">jhub.eaton-lab.org</code>) by 
registering a subdomain like below. 
This is where you need to enter the static IP address. When we start
the server we will tell it to serve at that IP address.</p>

<figure>
	<a href="https://eaton-lab.org/images/jhub-subdomain.png">
		<img src="https://eaton-lab.org/images/jhub-subdomain.png" alt="image" /></a>
</figure>

<h4 id="step-3-install-miniconda3-in-opt">Step 3. Install miniconda3 in /opt/</h4>
<p>The easiest way to get all required software is to use conda. We will need
to be able to run jupyterhub using sudo, and in a place that is accessible to all users (e.g., not from your user home directory), and so it’s easiest to install a separate and dedicated conda dir just for running your jupyterhub.
A common place for this is in <code class="language-plaintext highlighter-rouge">/opt/</code>. The commands below will install a fresh 
miniconda installation into /<code class="language-plaintext highlighter-rouge">opt</code>.</p>

<div class="language-bash highlighter-rouge"><div class="highlight"><pre class="highlight"><code><span class="c">## download a new miniconda3 installer (if on Mac use the Mac version!)</span>
curl <span class="nt">-O</span> https://repo.continuum.io/miniconda/Miniconda3-latest-Linux-x86_64.sh

<span class="c">## install miniconda dir into /opt/miniconda</span>
<span class="c">## -b agrees to the license terms</span>
<span class="c">## -p sets the install prefix path</span>
<span class="nb">sudo </span>bash Miniconda3-latest-Linux-x86_64.sh <span class="nt">-b</span> <span class="nt">-p</span> /opt/miniconda
</code></pre></div></div>

<h4 id="step-4-install-jupyterhub-in-optminicondabin">Step 4. Install jupyterhub in /opt/miniconda/bin/</h4>
<p>Now install jupyterhub and a few additional dependencies. Again, we’ll use 
sudo when installing the software, and because the user environment is hidden 
when using sudo, you need to write out the full path to the conda or pip 
binary.</p>

<div class="language-bash highlighter-rouge"><div class="highlight"><pre class="highlight"><code><span class="c">## write the full path to the opt/ conda binary</span>
<span class="nb">sudo</span> /opt/miniconda/bin/conda <span class="nb">install</span> <span class="nt">-c</span> conda-forge jupyterhub notebook ipykernel
</code></pre></div></div>

<p>And then install a few extra tools with pip, which we’ll be using to 
set up a user authenticator, and to run docker.</p>

<div class="language-bash highlighter-rouge"><div class="highlight"><pre class="highlight"><code><span class="c">## write the full path to the opt/ pip binary</span>
<span class="nb">sudo</span> /opt/miniconda/bin/pip <span class="nb">install </span>oauthenticator dockerspawner netifaces
</code></pre></div></div>

<h4 id="step-5-create-jupyterhub-directory-in-srv">Step 5. Create jupyterhub directory in /srv/</h4>
<p>Servers facing out to the world should be run from the <code class="language-plaintext highlighter-rouge">/srv/</code> directory, 
which also requires <code class="language-plaintext highlighter-rouge">sudo</code> permissions to modify, so let’s start by 
creating a directory for our config files there. This directory will 
contain some sensitive information, so for some types of setups 
you may want to modify the steps here to ensure users cannot 
see the information which could provide them access to your system. 
If you are following the same setup as me then connected users will end up 
in isolated Docker containers when they login, and so they’ll never have 
access to this location and security is not an issue.</p>

<div class="language-bash highlighter-rouge"><div class="highlight"><pre class="highlight"><code><span class="c">## create a new server directory and cd into it</span>
<span class="nb">sudo mkdir</span> <span class="nt">-p</span> /srv/jupyterhub
</code></pre></div></div>

<div class="language-bash highlighter-rouge"><div class="highlight"><pre class="highlight"><code><span class="c">## set permissions so users can rwx here</span>
<span class="nb">sudo chmod </span>ugo+rw /srv/jupyterhub
</code></pre></div></div>

<h4 id="step-6-generate-ssl-certificates-for-your-domain">Step 6. Generate SSL certificates for your domain</h4>
<p>We need to generate the SSL certificate that will allow users to “trust” our 
site when they connect to it. Since we have a domain name registered, we can
generate a cert and key file using the free tool <code class="language-plaintext highlighter-rouge">certbot</code>. You can get 
instructions for installing certbot on your system at 
<a href="https://certbot.eff.org]">https://certbot.eff.org</a>. I copied the Ubuntu 
instructions below.</p>

<div class="language-bash highlighter-rouge"><div class="highlight"><pre class="highlight"><code><span class="c">## install certbot on an Ubuntu system</span>
<span class="nb">sudo </span>apt-get update
<span class="nb">sudo </span>apt-get <span class="nb">install </span>software-properties-common
<span class="nb">sudo </span>add-apt-repository universe
<span class="nb">sudo </span>add-apt-repository ppa:certbot/certbot
<span class="nb">sudo </span>apt-get update
<span class="nb">sudo </span>apt-get <span class="nb">install </span>certbot
</code></pre></div></div>

<p>To generate the certificates call the <code class="language-plaintext highlighter-rouge">certbot</code> program and provide it your
domain name. This will generate a 90 day certificate and a job to renew the 
certificate every 30 days. The files will be written to 
/etc/letsencrypt/live/[domain name], which you will need to use <code class="language-plaintext highlighter-rouge">sudo</code> to 
look at.</p>

<div class="language-bash highlighter-rouge"><div class="highlight"><pre class="highlight"><code><span class="c"># generate certificate</span>
<span class="nb">sudo </span>certbot certonly <span class="nt">--standalone</span> <span class="nt">-d</span> jhub.eaton-lab.org

<span class="c"># test out the renewal process</span>
<span class="nb">sudo </span>certbot <span class="nt">-renew</span> <span class="nt">--dry-run</span>
</code></pre></div></div>

<pre><code class="language-stderr">...
IMPORTANT NOTES:
 - Congratulations! Your certificate and chain have been saved at:
   /etc/letsencrypt/live/jhub.eaton-lab.org/fullchain.pem
   Your key file has been saved at:
   /etc/letsencrypt/live/jhub.eaton-lab.org/privkey.pem
   ...
</code></pre>

<h4 id="step-7-start-to-configure-jupyterhub">Step 7. Start to configure Jupyterhub</h4>
<p>The jupyterhub config file can be intimidating when you first look at it 
because there so many lines of options. But most of those lines 
are commented out by default, meaning that they have not effect – the file 
doesn’t actually do anything until you edit it. Generate the config file like 
below. Then we will edit it by adding the basic information required to 
securely connect to the jupyterhub.</p>

<div class="language-bash highlighter-rouge"><div class="highlight"><pre class="highlight"><code><span class="c">## cd into jupyterhub dir</span>
<span class="nb">cd</span> /srv/jupyterhub

<span class="c">## generate config file</span>
/opt/miniconda/bin/jupyterhub <span class="nt">--generate-config</span>
</code></pre></div></div>

<div class="language-bash highlighter-rouge"><div class="highlight"><pre class="highlight"><code><span class="c">## generate a random cookie secret and store it in /srv/jupyterhub</span>
openssl rand <span class="nt">-hex</span> 32 <span class="o">&gt;</span> /srv/jupyterhub/jupyterhub_cookie_secret
</code></pre></div></div>

<div class="language-bash highlighter-rouge"><div class="highlight"><pre class="highlight"><code>%% editing /srv/jupyterhub/jupyter_config.py

<span class="c">## Configuration object for jupyterhub</span>
c <span class="o">=</span> get_config<span class="o">()</span>

<span class="c">## SSL connection</span>
c.Jupyterhub.jupyterhub_cookie_secret <span class="o">=</span> <span class="s2">"./jupyterhub_cookie_secret"</span>
c.JupyterHub.ssl_key <span class="o">=</span> <span class="s2">"/etc/letsencrypt/live/jhub.eaton-lab.org/privkey.pem"</span>
c.JupyterHub.ssl_cert <span class="o">=</span> <span class="s2">"/etc/letsencrypt/live/jhub.eaton-lab.org/fullchain.pem"</span>
c.JupyterHub.port <span class="o">=</span> 443             <span class="c"># standard port for SSL connections</span>
c.JupyterHub.ip <span class="o">=</span> <span class="s1">'128.59.232.200'</span>  <span class="c"># enter your static IP here</span>
</code></pre></div></div>

<h4 id="step-8-configure-an-authenticator">Step 8. Configure an Authenticator</h4>
<p>We now want to add a method for authenticating usernames and passwords
so that users can log into our system and trust that we are not stealing
their information. One easy way to do this is to use external authenticators
serviced by GitHub or Google. I use GitHub. To do this we need to first 
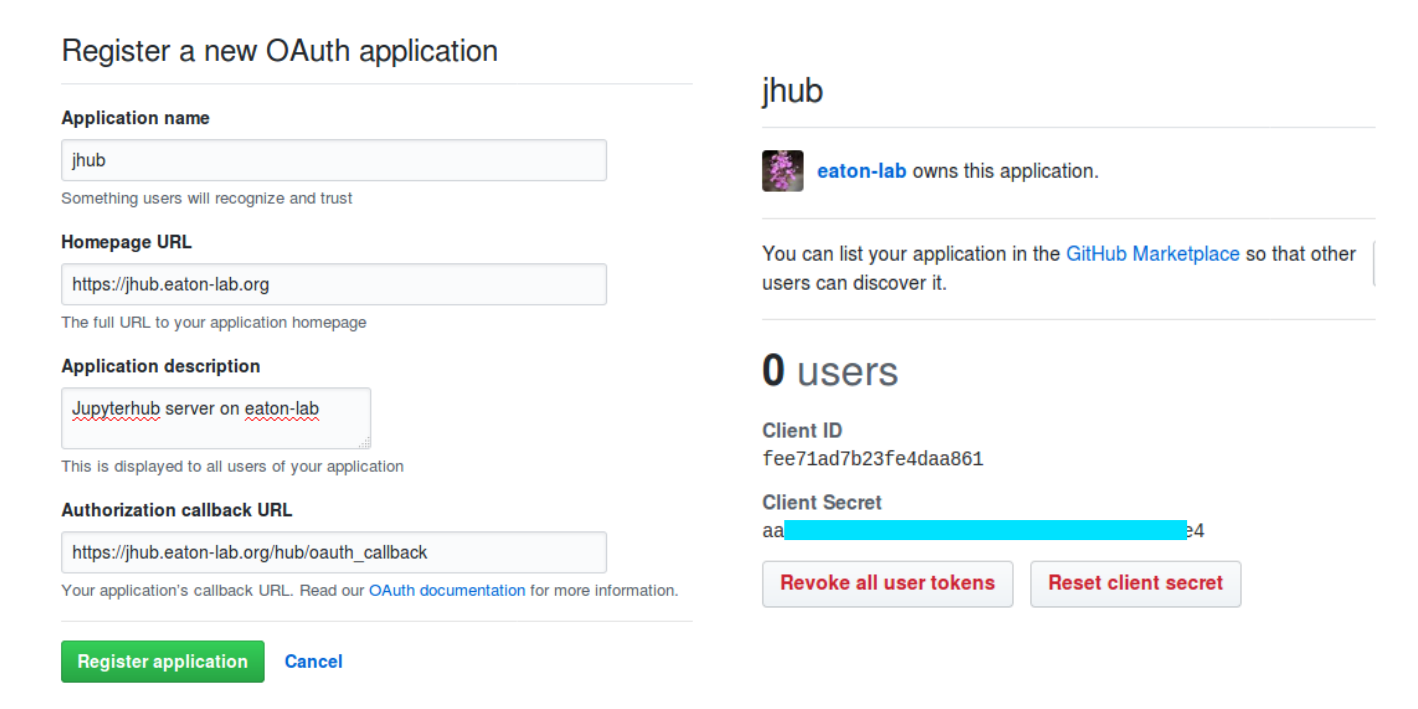
create an OAuthenticator app on GitHub. Login to your GitHub account and go 
to <code class="language-plaintext highlighter-rouge">Settings</code> by clicking on your icon in the upper right corner, and then you
should see a list of tabs on the left side of the next screen. Choose 
<code class="language-plaintext highlighter-rouge">Developer settings</code>, and then click on a button that says <code class="language-plaintext highlighter-rouge">New OAuth App</code>. 
Register your app by giving it a name, we then need to save the <code class="language-plaintext highlighter-rouge">callback URL</code>.
This will generate a Client ID and Client Secret. We will need those keys.</p>

<figure>
	<a href="https://eaton-lab.org/images/OAuth.png">
		<img src="https://eaton-lab.org/images/OAuth.png" alt="image" /></a>
</figure>

<p>Let’s then store these values in the jupyterhub config file after telling it
that we are using the <code class="language-plaintext highlighter-rouge">GitHubOAuthenticator</code> object as our authenticator.
The oauth callback url, client_id, and client_secret can be found on your 
GitHub app (see above). Note: do not share your client_secret.</p>

<div class="language-bash highlighter-rouge"><div class="highlight"><pre class="highlight"><code>%% editing /srv/jupyterhub/jupyter_config.py

<span class="c">## Add authentication through github</span>
c.JupyterHub.authenticator_class <span class="o">=</span> <span class="s2">"oauthenticator.GitHubOAuthenticator"</span>
c.GitHubOAuthenticator.oauth_callback_url <span class="o">=</span> <span class="s1">'https://jhub.eaton-lab.org/hub/oauth_callback'</span>
c.GitHubOAuthenticator.client_id <span class="o">=</span> <span class="s1">'fee71ad7b23fe4daa861'</span>
c.GitHubOAuthenticator.client_secret <span class="o">=</span> <span class="o">{</span>hidden<span class="o">}</span>  <span class="c">## you would copy the real secret here</span>
</code></pre></div></div>

<p>Now we need to tell jupyterhub which GitHub usernames are approved to login 
to our server (when running a workshop or class you can also add these on the
fly later). I add my own username as an administrator, and optionally you can
add a usermap dictionary that will translate GitHub login names to the user
names on the workstation if they are different.</p>

<div class="language-bash highlighter-rouge"><div class="highlight"><pre class="highlight"><code>%% editing /srv/jupyterhub/jupyter_config.py

<span class="c">## Who is allowed access the server</span>
c.Authenticator.admin_users <span class="o">=</span> <span class="o">{</span><span class="s2">"eaton-lab"</span><span class="o">}</span>
c.Authenticator.whitelist <span class="o">=</span> <span class="o">{</span>
    <span class="s2">"eaton-lab"</span>,
    <span class="s2">"isaacovercast"</span>,
    <span class="s2">"pmckenz1"</span>,
    <span class="s2">"camayal"</span>,
<span class="o">}</span>
c.Authenticator.username_map <span class="o">=</span> <span class="o">{</span>
    <span class="s2">"eaton-lab"</span>: <span class="s2">"deren"</span>,
    <span class="s2">"pmckenz1"</span>: <span class="s2">"patrick"</span>,
    <span class="s2">"isaacovercast"</span>: <span class="s2">"isaac"</span>,
    <span class="s2">"camayal"</span>: <span class="s2">"carlos"</span>,
<span class="o">}</span>
</code></pre></div></div>

<h4 id="step-8-configure-a-spawner">Step 8. Configure a Spawner</h4>
<p>Here I diverge from a simpler setup in order to provide two different 
spawning options, one for lab users that have a user account on the 
workstation, and another for temporary users that do not have permanent 
accounts. This is possible using the WrapSpawner, one of several available
spawners from jupyterhub (e.g., we already installed DockerSpawner earlier). It can be installed with pip:</p>

<div class="language-bash highlighter-rouge"><div class="highlight"><pre class="highlight"><code>pip <span class="nb">install </span>git+https://github.com/jupyterhub/wrapspawner
</code></pre></div></div>

<p>In your config file you can then create multiple spawn profiles, each linked
to a different spawner setup. Here our different spawner setups include different docker images or volumes. In my setup Eaton-lab members use the <code class="language-plaintext highlighter-rouge">dockerspawner.SystemUserSpawner</code> which puts them in the <code class="language-plaintext highlighter-rouge">jhub-lab3</code> docker image
but with access to their home directory on the system. Other temporary users
are spawned with <code class="language-plaintext highlighter-rouge">dockerspawner.DockerSpawner</code> as anonymous users (jovyan in 
docker parlance). They will have a <code class="language-plaintext highlighter-rouge">work</code> directory that can persist over multiple
sessions until I eventually remove it.</p>

<div class="language-bash highlighter-rouge"><div class="highlight"><pre class="highlight"><code>%% editing /srv/jupyterhub/jupyter_config.py
c.JupyterHub.spawner_class <span class="o">=</span> <span class="s1">'wrapspawner.ProfilesSpawner'</span>
c.Spawner.http_timeout <span class="o">=</span> 120
c.ProfilesSpawner.profiles <span class="o">=</span> <span class="o">[</span>

    <span class="c"># container image=labhub, volume=/home/&lt;username&gt;</span>
    <span class="o">(</span><span class="s1">'Eaton Lab (sacra system users)'</span>,
         <span class="s1">'Eaton lab members'</span>,
         <span class="s1">'dockerspawner.SystemUserSpawner'</span>,
         dict<span class="o">(</span>
             <span class="nv">image</span><span class="o">=</span><span class="s2">"dereneaton/jhub-lab3"</span>,
             <span class="nv">remove_containers</span><span class="o">=</span>True,
         <span class="o">)</span>,
    <span class="o">)</span>,

    <span class="c"># container image=labhub, volume=shared-docker-volumes</span>
    <span class="o">(</span><span class="s1">'Docker Temp Users'</span>,
         <span class="s1">'temp docker user'</span>,
         <span class="s1">'dockerspawner.DockerSpawner'</span>,
         dict<span class="o">(</span>
             <span class="nv">image</span><span class="o">=</span><span class="s2">"dereneaton/jhub-lab3"</span>,
             <span class="nv">remove_containers</span><span class="o">=</span>True,
             <span class="nv">volumes</span><span class="o">={</span>
                 <span class="s2">"jhub-user-{username}"</span>: <span class="s2">"/home/jovyan/work"</span>,
                 <span class="s2">"data"</span>: <span class="o">{</span>
                     <span class="s2">"bind"</span>: <span class="s2">"/home/jovyan/ro-data"</span>,
                     <span class="s2">"mode"</span>: <span class="s2">"ro"</span>,
                     <span class="o">}</span>,
                 <span class="o">}</span>
         <span class="o">)</span>,
    <span class="o">)</span>,
<span class="o">]</span>

c.JupyterHub.hub_ip <span class="o">=</span> c.JupyterHub.ip
c.JupyterHub.cookie_max_age_days <span class="o">=</span> 10
c.JupyterHub.active_server_limit <span class="o">=</span> 30
</code></pre></div></div>

<h4 id="step-9-get-docker-images">Step 9. Get Docker Images</h4>
<p>Use <a href="https://docs.docker.com/engine/installation/">Docker’s installation instructions</a> to install Docker on your system. Then run the following command to make sure your docker is working.</p>

<div class="language-bash highlighter-rouge"><div class="highlight"><pre class="highlight"><code><span class="c">## run the test image hello-world</span>
docker run hello-world
</code></pre></div></div>

<p>We are going to want to setup two docker images: one with the basic code to 
start jupyter notebooks for users, and that details all of the software that 
we want to make available to users when they login. The first, called singleuser, is easy and can be downloaded with the command below. The second can also be
downloaded easily if you want to just copy my setup. I’ll detail in a later 
post how I created the docker image so you can customize it.</p>

<div class="language-bash highlighter-rouge"><div class="highlight"><pre class="highlight"><code><span class="c">## the image docker will use to start notebooks</span>
docker pull jupyterhub/singleuser

<span class="c">## optionally also pull my docker setup</span>
docker pull dereneaton/jhub-lab3
</code></pre></div></div>

<h4 id="finished">Finished</h4>

<p>You can now start the jupyterhub on your workstation by running:</p>

<div class="language-bash highlighter-rouge"><div class="highlight"><pre class="highlight"><code><span class="nb">sudo</span> /opt/miniconda/bin/jupyterhub <span class="nt">-f</span> /srv/jupyterhub/jupyter_config.py
</code></pre></div></div>

<p>Users can then login by visiting your domain address:</p>

<figure>
	<a href="https://eaton-lab.org/images/jhub-login-example2.gif">
		<img src="https://eaton-lab.org/images/jhub-login-example2.gif" alt="jhub login GIF" /></a>
</figure>

<p>Users will have access to a prebuilt set of software tools defined in the 
docker image. They will also be located in an isolated linux system so that 
they can install additional software as well, for example from 
<code class="language-plaintext highlighter-rouge">/opt/conda/bin/conda</code>.</p>]]></content><author><name>Deren Eaton</name><email>de2356@columbia.edu</email></author><category term="articles" /><category term="Jupyter" /><category term="Server" /><category term="Python" /><category term="Teaching" /><category term="Conda" /><category term="JupyterHub" /><summary type="html"><![CDATA[For workshops, assignments, and demonstrations]]></summary><media:thumbnail xmlns:media="http://search.yahoo.com/mrss/" url="https://eaton-lab.org/%7B%22feature%22=%3E%22header_ped.png%22%7D" /><media:content medium="image" url="https://eaton-lab.org/%7B%22feature%22=%3E%22header_ped.png%22%7D" xmlns:media="http://search.yahoo.com/mrss/" /></entry><entry><title type="html">Eaton-lab HPC instructions</title><link href="https://eaton-lab.org/articles/Eaton-lab-HPC-setup/" rel="alternate" type="text/html" title="Eaton-lab HPC instructions" /><published>2018-12-09T00:00:00+00:00</published><updated>2018-12-09T00:00:00+00:00</updated><id>https://eaton-lab.org/articles/Eaton-lab-HPC-setup</id><content type="html" xml:base="https://eaton-lab.org/articles/Eaton-lab-HPC-setup/"><![CDATA[<hr />

<h4 id="columbia-hpc-resources">Columbia HPC resources</h4>
<p>We have access to both the <em>Terremoto</em> and <em>Habanero</em> clusters. 
Documentation for Terremoto is <a href="https://confluence.columbia.edu/confluence/display/rcs/Terremoto+HPC+Cluster+User+Documentation">here</a>, and Habanero <a href="https://confluence.columbia.edu/confluence/display/rcs/Habanero+HPC+Cluster+User+Documentation">here</a>). On Habanero
Eaton lab members have access to 8Tb of scratch space and about 20 24-core nodes,
but these resources are shared and often busy. On Terremoto we have one
reserved 24 core node and 6Tb of scratch space, and can access all other shared
resources. On both clusters the max walltime is 5 days 
(or 6 hours on the free partition, or 12 hours on the short partition).</p>

<h3 id="connecting-by-ssh">Connecting by SSH</h3>
<p>Use SSH from a terminal and your UNI credentials to login.</p>
<div class="language-bash highlighter-rouge"><div class="highlight"><pre class="highlight"><code><span class="c"># Connect to habanero from your local computer</span>
ssh &lt;user&gt;@habanero.rcs.columbia.edu

<span class="c"># OR, connect to terremoto from your local computer</span>
ssh &lt;user&gt;@moto.rcs.columbia.edu
</code></pre></div></div>

<h3 id="setup-your-scratch-directory">Setup your scratch directory</h3>
<p>On Habanero you can access the “dsi” partition, on Terremoto use the “eaton” 
partition. You can create a user specific scratch directory in the the 
partition named with your UNI. This is where you should store large data files. 
If you think you will need to share the data with others then use the ‘project’
space on Terremoto in the eaton directory.</p>

<div class="language-bash highlighter-rouge"><div class="highlight"><pre class="highlight"><code><span class="c"># ON HABANERO</span>
<span class="c"># make a directory in the scratch space</span>
<span class="nb">mkdir</span> /rigel/dsi/users/&lt;user&gt;

<span class="c"># make a symlink from your home dir</span>
<span class="nb">ln</span> <span class="nt">-s</span> /rigel/dsi/users/&lt;user&gt; ~/scratch-dsi

<span class="c"># ON TERREMOTO</span>
<span class="c"># make a directory in the scratch space</span>
<span class="nb">mkdir</span> /moto/eaton/users/&lt;user&gt;

<span class="c"># make a symlink from your home dir</span>
<span class="nb">ln</span> <span class="nt">-s</span> /moto/eaton/users/&lt;user&gt; ~/scratch-user
<span class="nb">ln</span> <span class="nt">-s</span> /moto/eaton/projects ~/scratch-projects
</code></pre></div></div>

<p>To transfer files from your local computer to the cluster you can use <code class="language-plaintext highlighter-rouge">scp</code>, 
or you can download data directly on the cluster if it is hosted online 
somewhere. The two clusters do not share a disk space, unfortunately, so you 
cannot copy data to one and access it from the other. Better to choose one 
cluster for your project, probably moto.</p>
<div class="language-bash highlighter-rouge"><div class="highlight"><pre class="highlight"><code><span class="c"># On your local computer</span>
<span class="c"># transfer files or dirs from your local computer to the scratch space</span>
scp &lt;path-to-file-or-dir&gt; &lt;user&gt;@habanero.rcs.columbia.edu:/rigel/dsi/users/&lt;user&gt; 
</code></pre></div></div>

<!-- 
### Install local software
Follow my [instructions coming soon post](...) for installing conda 
locally, and then use conda to install software. There is also system wide 
software available that you can look into, but meh. Unfortunately your home 
directory is only 10Gb which is not large enough to install many kernels into. 
If you plan to install a lot of software I would suggest installing conda into
your scratch space instead of home. If you only need one conda environment then
your home space should suffice. 
 -->

<h3 id="submit-jobs-to-the-cluster-using-slurm">Submit jobs to the cluster using SLURM</h3>
<p>Both clusters use the SLURM job submission system to manage shared resources on the 
cluster. When you login you will be connected to the <em>head</em> node, which is 
simply a landing pad. You should not run any intensive tasks on this node. 
Instead, submit your jobs using a <em>job script</em> to take care of reserving 
resources for your job and sending it to run on a <em>compute node</em>.</p>

<p>First we’ll make some directories to help ourselves stay organized; one 
directory for job scripts and one directory for log files, which store the 
output of running jobs.</p>
<div class="language-bash highlighter-rouge"><div class="highlight"><pre class="highlight"><code><span class="c"># On the head node</span>
<span class="nb">mkdir</span> ~/slurm-scripts/
<span class="nb">mkdir</span> ~/slurm-logs/
</code></pre></div></div>

<hr />

<h4 id="example-job-submission">Example job submission</h4>
<p>The header at the top of the file tells the scheduler the resources we need, which account to use (“dsi”) and how the job and output files should be named. The scripts below the header will be executed on compute node(s) once they are available. In the command below we reserve one core and simply execute the <code class="language-plaintext highlighter-rouge">echo</code> command to print text to the output. I name the file <code class="language-plaintext highlighter-rouge">moto-helloworld.sh</code> and put it in the <code class="language-plaintext highlighter-rouge">slurm-scripts/</code> dir.</p>

<div class="language-bash highlighter-rouge"><div class="highlight"><pre class="highlight"><code><span class="c"># open file with nano text editor on the head node</span>
nano ~/slurm-scripts/moto-helloworld.sh
</code></pre></div></div>

<div class="language-bash highlighter-rouge"><div class="highlight"><pre class="highlight"><code><span class="c">#!/bin/sh</span>
<span class="c">#SBATCH --account=eaton</span>
<span class="c">#SBATCH --cores=1    </span>
<span class="c">#SBATCH --time=5:00</span>
<span class="c">#SBATCH --workdir=/moto/home/de2356/slurm-logs/</span>
<span class="c">#SBATCH --job-name=hello</span>

<span class="nb">echo</span> <span class="s2">"hello world"</span>
</code></pre></div></div>

<p>Submit the job to the scheduling queue.</p>
<div class="language-bash highlighter-rouge"><div class="highlight"><pre class="highlight"><code><span class="c"># On the head node</span>
sbatch ~/slurm-scripts/moto-helloworld.sh
</code></pre></div></div>

<p>Check whether it has started yet:</p>
<div class="language-bash highlighter-rouge"><div class="highlight"><pre class="highlight"><code><span class="c"># On the head node</span>
squeue <span class="nt">-u</span> &lt;user&gt;
</code></pre></div></div>

<p>Once it starts check your log files for the output:</p>
<div class="language-bash highlighter-rouge"><div class="highlight"><pre class="highlight"><code><span class="c"># On the head node</span>
<span class="nb">cat</span> ~/slurm-logs/&lt;jobid&gt;.log
</code></pre></div></div>

<hr />

<h4 id="start-a-notebook-server">Start a notebook server</h4>
<p>I do most of my work on jupyter notebooks which also provide a really nice way 
to connect and work interactively on compute nodes. To start a notebook server
let’s start by generating a config file and a password. This is optional – 
if you don’t set a password then a temporary <em>token</em> will be generated when you
start a notebook – but setting a password makes connecting a bit simpler. You 
will of course need to have jupyter installed already.</p>
<div class="language-bash highlighter-rouge"><div class="highlight"><pre class="highlight"><code><span class="c"># On the head node</span>
jupyter-notebook <span class="nt">--generate-config</span>
jupyter-notebook password
</code></pre></div></div>

<p>Next let’s write a job submission script to start a notebook server. In the example below we reserve one entire node (all 24 cores by asking –exclusive). We also designate a specific port and IP to run the notebook server from. The port can be any number between 8000-9999, it is easiest if you just pick your favorite number and use it all the time. I typically use 8888 for notebooks I run locally and 9999 for notebooks I connect to remotely. The IP/hostname of the compute node is generated by the command <code class="language-plaintext highlighter-rouge">hostname</code> in the script.</p>

<div class="language-bash highlighter-rouge"><div class="highlight"><pre class="highlight"><code><span class="c"># On the head node</span>
nano ~/slurm-scripts/moto-jupyter-1n-1d.sh
</code></pre></div></div>

<div class="language-bash highlighter-rouge"><div class="highlight"><pre class="highlight"><code><span class="c">#!/bin/sh</span>
<span class="c">#SBATCH --account=eaton</span>
<span class="c">#SBATCH --nodes=1    </span>
<span class="c">#SBATCH --exclusive    </span>
<span class="c">#SBATCH --time=1-00:00:00</span>
<span class="c">#SBATCH --workdir=/moto/home/de2356/slurm-scripts/</span>
<span class="c">#SBATCH --job-name=jupyter</span>

<span class="c">## unset XDG variable (required when running jupyter on HPC)</span>
<span class="nb">cd</span> <span class="nv">$HOME</span>
<span class="nv">XDG_RUNTIME_DIR</span><span class="o">=</span><span class="s2">""</span>
jupyter-notebook <span class="nt">--no-browser</span> <span class="nt">--ip</span><span class="o">=</span><span class="si">$(</span><span class="nb">hostname</span><span class="si">)</span> <span class="nt">--port</span><span class="o">=</span>9999
</code></pre></div></div>

<p>Submit the job:</p>
<div class="language-bash highlighter-rouge"><div class="highlight"><pre class="highlight"><code><span class="c"># On the head node</span>
sbatch slurm-scripts/moto-jupyter-1n-1d
</code></pre></div></div>

<p>Check if the job has started, and take note of the <code class="language-plaintext highlighter-rouge">hostname</code> of the node it has connected you to.</p>
<div class="language-bash highlighter-rouge"><div class="highlight"><pre class="highlight"><code><span class="c"># On the head node</span>
squeue <span class="nt">-u</span> &lt;user&gt;
</code></pre></div></div>

<p>Once it starts you can connect your local computer to the notebook server running on the compute node by creating an SSH tunnel. Run the command below from your local machine, <strong>substituting in the hostname of the node that you connected to</strong> in place of the name <code class="language-plaintext highlighter-rouge">t103</code>. Once executed, leave this terminal window open and minimize it into the corner. You can just leave it for as long as you want to maintain the tunnel connection.</p>
<div class="language-bash highlighter-rouge"><div class="highlight"><pre class="highlight"><code><span class="c">## On your local computer</span>
ssh <span class="nt">-N</span> <span class="nt">-L</span> 9999:t103:9999 de2356@moto.rcs.columbia.edu
</code></pre></div></div>

<p>Now open a browser on your local computer (e.g., laptop) and enter the address <code class="language-plaintext highlighter-rouge">localhost:9999</code></p>

<!-- ### Waiting on the queue
The wait times on the queue can be pretty extreme, so waiting for a job to 
start so that you can work interactively in a notebook is not really ideal, 
at least until the size of the cluster improves dramatically. A better 
alternative can be to start your notebook on an interactive node, or on free, 
and then start an ipcluster instance as a queued job and connect to it from 
your notebook once it starts. More on that in another post. For jobs with a long
wait time it can be useful to set an email alert for when the job start. This
can be done with in the slurm script by adding:

```bash
#SBATCH --mail-type=ALL
#SBATCH --mail-user=de2356@columbia.edu
``` -->

<h3 id="interactive-mode">Interactive mode</h3>
<p>If you only plan to do a very small amount of work it is better to just jump into
an interactive session rather than submit a job to start a notebook server or to 
request many resources. This type of job will usually start quickly.</p>

<div class="language-bash highlighter-rouge"><div class="highlight"><pre class="highlight"><code><span class="c"># ask for 30 min interactive session</span>
srun <span class="nt">--pty</span> <span class="nt">-t</span> 30:00 <span class="nt">--account</span><span class="o">=</span>dsi /bin/bash
</code></pre></div></div>]]></content><author><name>Deren Eaton</name><email>de2356@columbia.edu</email></author><category term="articles" /><category term="conda" /><category term="jupyter" /><category term="HPC" /><category term="python" /><category term="Columbia" /><category term="Habanero" /><category term="Terremoto" /><summary type="html"><![CDATA[Notes on using Columbia HPC resources for Eaton lab members.]]></summary><media:thumbnail xmlns:media="http://search.yahoo.com/mrss/" url="https://eaton-lab.org/%7B%22feature%22=%3E%22header_ped.png%22%7D" /><media:content medium="image" url="https://eaton-lab.org/%7B%22feature%22=%3E%22header_ped.png%22%7D" xmlns:media="http://search.yahoo.com/mrss/" /></entry><entry><title type="html">Maia presents at undergraduate thesis poster session</title><link href="https://eaton-lab.org/posts/maia-poster/" rel="alternate" type="text/html" title="Maia presents at undergraduate thesis poster session" /><published>2018-12-07T00:00:00+00:00</published><updated>2018-12-07T00:00:00+00:00</updated><id>https://eaton-lab.org/posts/maia-poster</id><content type="html" xml:base="https://eaton-lab.org/posts/maia-poster/"><![CDATA[<hr />

<p>
Congratulations to Maia Hernandez on presenting her thesis research at the undergraduate research poster session in E3B. Maia is studying hybridization and phylogenomics in the American live oaks using genomic RAD-seq data, and investigating bioinformatic approaches to combining these data with information from a closely related reference genome. 

<figure>
	<a href="https://eaton-lab.org/images/poster-maia-2.jpg">
		<img src="https://eaton-lab.org/images/poster-maia-2.jpg" alt="maia image" />
	</a>
</figure>


<figure>
	<a href="https://eaton-lab.org/images/poster-maia-1.jpg">
		<img src="https://eaton-lab.org/images/poster-maia-1.jpg" alt="poster image" />
	</a>
</figure>

</p>]]></content><author><name>Deren Eaton</name><email>de2356@columbia.edu</email></author><category term="posts" /><category term="Columbia" /><category term="E3B" /><category term="undergraduate research" /><category term="oaks" /><summary type="html"><![CDATA[Oak phylogenomics poster]]></summary><media:thumbnail xmlns:media="http://search.yahoo.com/mrss/" url="https://eaton-lab.org/%7B%22feature%22=%3E%22header_ped.png%22%7D" /><media:content medium="image" url="https://eaton-lab.org/%7B%22feature%22=%3E%22header_ped.png%22%7D" xmlns:media="http://search.yahoo.com/mrss/" /></entry><entry><title type="html">Welcome Jared Meek and Guo Cen to the lab!</title><link href="https://eaton-lab.org/posts/welcome-new-lab-2/" rel="alternate" type="text/html" title="Welcome Jared Meek and Guo Cen to the lab!" /><published>2018-09-17T00:00:00+00:00</published><updated>2018-09-17T00:00:00+00:00</updated><id>https://eaton-lab.org/posts/welcome-new-lab-2</id><content type="html" xml:base="https://eaton-lab.org/posts/welcome-new-lab-2/"><![CDATA[<hr />

<p>The Eaton lab is happy to welcome two new members: <strong>Jared Meek</strong> and 
<strong>Guo Cen</strong>. Jared is a new M.A. student interested in plant systematics and conservation. Before even starting in the E3B program he already joined 
our field expedition this summer to the Hengduan Mountains, and so he is 
hitting the ground running with tons of data in hand to study phylogeography 
in <em>Pedicularis</em>. Guo Cen is a visiting Ph.D. student from the Chinese Academy of Sciences graduate program at the Kunming Institute of Botany, and was awarded
a fellowship to study internationally. She is investigating the phylogeny and diversification of temperate 
bamboo species.</p>

<figure>
	<a href="https://eaton-lab.org/images/Guo-Cen-small.jpg">
		<img src="https://eaton-lab.org/images/Guo-Cen-photo.jpg" alt="GC image" />
	</a>
</figure>

<figure>
	<a href="https://eaton-lab.org/images/Jared-photo1.jpg">
		<img src="https://eaton-lab.org/images/Jared-photo1.jpg" alt="Jared image" />
	</a>
</figure>]]></content><author><name>Deren Eaton</name><email>de2356@columbia.edu</email></author><category term="posts" /><category term="Social" /><category term="Columbia" /><category term="E3B" /><summary type="html"><![CDATA[New projects in the Hengduan Mountains]]></summary><media:thumbnail xmlns:media="http://search.yahoo.com/mrss/" url="https://eaton-lab.org/%7B%22feature%22=%3E%22header_ped.png%22%7D" /><media:content medium="image" url="https://eaton-lab.org/%7B%22feature%22=%3E%22header_ped.png%22%7D" xmlns:media="http://search.yahoo.com/mrss/" /></entry></feed>